Once you've made decisions, you can inform your authors and panel organisers of the news.
Step 1: Publish your submission decisions
Navigate to the Reviews hub and ensure you are viewing the List of Submissions. You can now publish your decisions on accepted and rejected submissions in one of three ways:
Important note: The steps below will publish submissions, not panel contributions. Please see step 2 for steps on publishing panels and panel contributions, if using the panels feature.
1 - Publish an individual decision
You can publish decisions one by one by clicking on Publish this Decision.

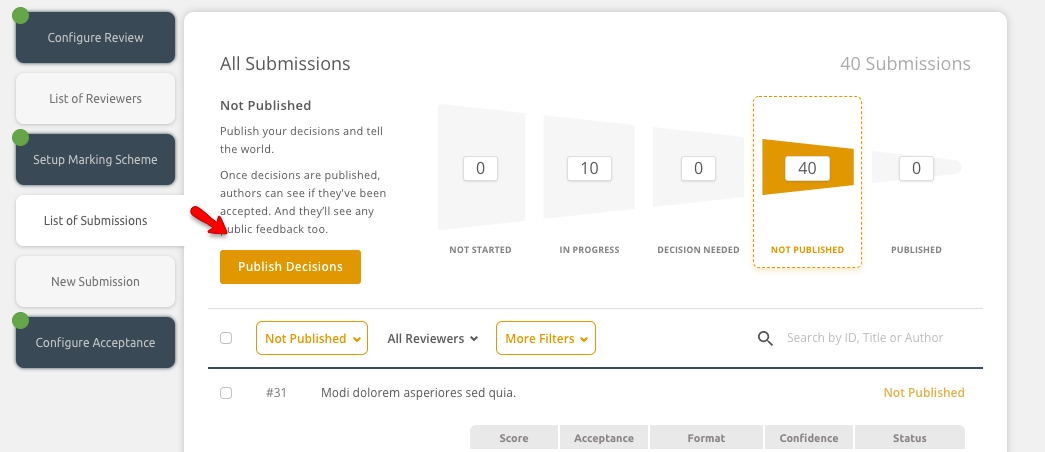
2 - Publish all decisions
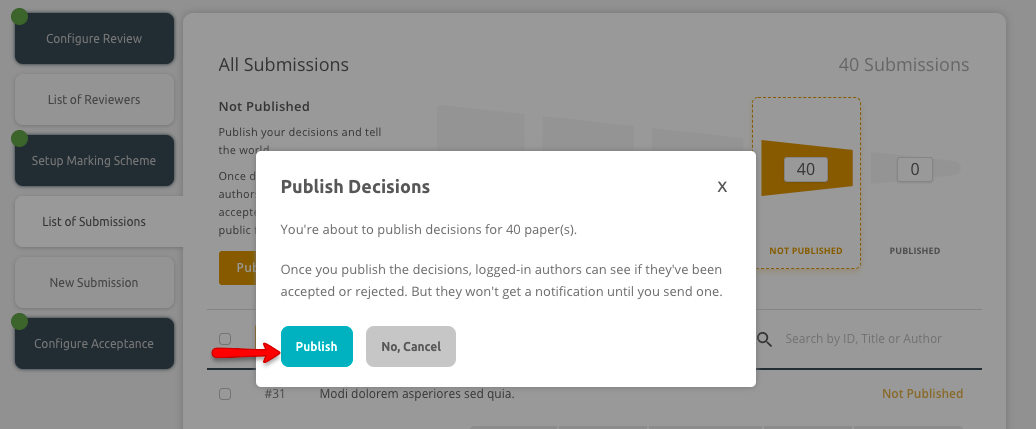
You can also publish decisions in bulk by viewing the Not published section in the Review funnel as below and clicking on the button. Publish Decisions button.
3 - Publish some, but not all decisions
Need to publish some, but not all decisions? No problem! You can select specific submissions and use the Publish button to do so.

You can also filter your list of Not Published submission down by track / review group (if using) or other criteria like decision type. Check out the More Filters tab for full options and the tracks/review groups filter at the very top of the page. After narrowing down the list, you can then select the filtered submissions and use the Publish button.

You will then be asked to confirm the action:
Step 2: Publish your panel and panel contributions:
If you are not using the panels feature on your site, go to step 3.
You can publish your panel decisions and panel contribution decisions using actions in the List of Panels.
Publishing a panel will also publish all associated panel contributions.
You can publish:
- all panel and panel contribution decisions by hitting the Publish Decisions button to the left-hand side of the progress funnel
- individual panel and panel contribution decisions by clicking Publish this Decision to the right-hand side of the review summary

You can publish some, but not all, panel and and panel contribution decisions by placing a check to the left-hand side of a panel and then clicking on the Publish button.

Step 3: Notify accepted authors on individual submissions and panel contributions
The Submissions Notification of Decisions card will appear on your dashboard after you have published submissions. This card enables you to notify authors on submissions and panel contributions (if using the panels feature).
If your site has tracks enabled, be sure to look at specific tracks when sending your notifications.

You will see two main categories: Accepted and Rejected. You will see either an orange or white button underneath each. The orange button indicates that you have not notified the group yet. The white button means there is no action to take! Click on an orange button to head to the Communication hub.

Do you need to give different information to different decision types? No problem! Modify the Acceptance Format filter to message a specific group only. You can then return to the dashboard and click on the orange button to notify a different group, and use the Acceptance Format filter again. You can also choose which type of author to notify by modifying the Author Type Filter, or email all authors your decision.

If you notify decision types separately, be sure to return to your dashboard and use the Submissions Notification of Decisions card to notify authors who you haven't emailed quite yet.
You'll know that you have sent out emails to all authors when the orange buttons have disappeared!

Step 4: Notify Panel Organisers
Locate the Panels Decisions Overview card. If using tracks, click on a specific track to get started.

Click on the orange button to notify accepted or rejected panels. Follow the prompts in the Communication hub to send the notification out to the specific group. Once complete, return to the dashboard and notify the other group of panel organisers

FAQs and tips:
Have I notified everyone yet?
There are two ways to know if you have completed your notifications when using the Decisions cards.
1 - Seeing orange buttons on the Decisions cards indicates you have not notified all authors. Both buttons will be white when all notifications have been sent.

2 - If you are using tracks, you will see the Notify stats on the Decisions cards.

Tips on curating your notification emails:
The notification email is a great place to share key information like how to register and instructions on how to upload a final paper. Be sure to give the email a name that inspires authors to open it! Click Next when ready.

If you are happy with the content of an email scroll down to the bottom of the page. You will have 2 different options before you send out your decision notification.
- From Name: This field indicates who the message will appear to come from. You will be able to choose from the names of the conference administrators or use the conference's short name.
- Reply To: here you can set who should receive any responses. You can choose the conference email or the email of one of the administrators.

Select Next to see your email Preview. You can send a test email to yourself or any other administrator in the system. Click Next again when ready.

You can now confirm that you are ready to send your notification by hitting the Send Message button.
