Stage Managers play a role similar to AV technicians at a physical conference. It’s their responsibility to look after all of the technical aspects of a live session. This article details the different responsibilities and steps you’ll need to complete to ensure you’re successful in your role as Stage Manager.
Stage Manager is the term used on Ex Ordo. In Webex, this person is called a host.
Conference administrators must assign one person to be the stage manager for each stage on each day in Ex Ordo. This person will open the Webex room so others can join. We highly recommend having a back up stage manager in each virtual meeting room. Back up stage managers should enter the room as an attendee first. The stage manager can then promote them to be a co-host in Webex.
All stage managers should take part in training and run as many rehearsals as possible to ensure the conference runs smoothly.
Stage Manager responsibilities
At its core, the role of the Stage Manager involves:
- Opening the virtual meeting room
- Prepping the Stage to mirror what the conference organisers have planned (e.g., disable the chat if not using, limit attendee communication privileges, etc.)
- Recording the sessions/presentations
- Promoting/Demoting Attendees to Panelists
- Passing the Presenter role to Active Presenters
The Conference Organisers may add to or adjust the scope of the role based on how they want their event to run.
Before the Event
Step 1: Ensure you have system access
In order to fulfil the role of Stage Manager you must:
- install Webex (On iOS Catalina and newer OS versions you will be prompted to set Security&Privacy permissions first. This will allow you use of screen share and microphone)
- be added into Webex by the Ex Ordo Support team
- activate your Cisco Webex account by clicking the link in the email received
- after you have activated your Webex account, the conference admins will add you in Ex Ordo. Admins can out this article for more details: Creating Stage Manager Accounts on Webex and Ex Ordo
- be added as a Stage Manager to a stage day
If you are not sure about any of these, please contact the conference organisers directly.
Step 2: Create and Run a Rehearsal
It's important you take time to create and run your own rehearsals in Ex Ordo. Through practice you will become more comfortable with the role. For instructions on how to create and run a rehearsal, see this article: Create and Run a Stage Manager Rehearsal
Step 3: Finalise your technical setup
Ensure you are familiar with the following technical recommendation and specification.
- We recommend that the Stage Manager have a reliable Internet connection; fibre connected via a corporate / university connection over a wired cable where possible (avoid WiFi if you can).
- You must host the live stage on a Windows or Mac laptop or desktop computer. Otherwise, you won’t be able to access it.
- Make sure your computer has all the necessary upgrades installed.
- Make sure you log in with the Webex app. You cannot be a stage manager of a meeting through an internet browser.
- For other technical specifications, check out this article: Technical Specifications for Joining a Live Stage
Step 4: Gather Session/Event Information
It’s important to be prepared and have a list of speakers and presentations to hand. Gather or create a list of presentation timings to make sure you stay on track. You'll need this checklist to know which attendees to promote at the right time so no one accidentally interrupts the person speaking. You can also distribute it to others involved. If you will have a back-up Stage Manager in attendance, share it with them too.
Step 5: Prepare Files
If you’re sharing presentation slides on behalf of the presenters, ensure you have them organised in advance so you can share them in the correct order. Check out the tips below and reach out to the conference organisers with any questions.
- Holding slides are a great idea to share at the beginning of your session as attendees join or during breaks. Sharing some information via slides can help assure your attendees that they’re in the correct session. The Conference Organisers may provide you with branded slides which could include a welcome slide, session information, or break slides to use. If not, consider creating some yourself.
- If you are going to play video recordings for attendees during a meeting, make sure they are saved to your computer. Streaming videos during a meeting is not recommended as it decreased video/sound quality.
- If you will have a back-up Stage Manager in attendance, make sure they also have access to all necessary files.
2. Prepare for going live
Step 1: Start the Live Stage
Check out this article for a step by step guide: Starting a live session (Webex Webinars).
You can start the stage up to 1 hour before the stage is due to go live for attendees to join. We recommend starting the stage early to give you some breathing room to start hosting and prepare for the sessions ahead.
Step 2: Change meeting settings
The conference organisers may have asked you to modify the default meeting settings. Some examples include:
- Enable/Disable Panels: Chat, Q&A, Polling, etc.
- Configure Chat to limit/change attendee messaging privileges (if using Chat)
- Disable Attendee View (if not wanted)
You can change the meeting settings at the start of the stage day or at any point throughout the day. You do not have to close and restart a stage if the settings need to be updated throughout the day.
If a stage is fully closed and reopened later, the settings will revert back to the default. You must modify the settings each time a stage is opened if directed to by the conference admins.
Enable/Disable Panels: Chat, Q&A, Polling, etc.
From the Webex Meetings menu in the upper-right hand corner, select Webinar Options.
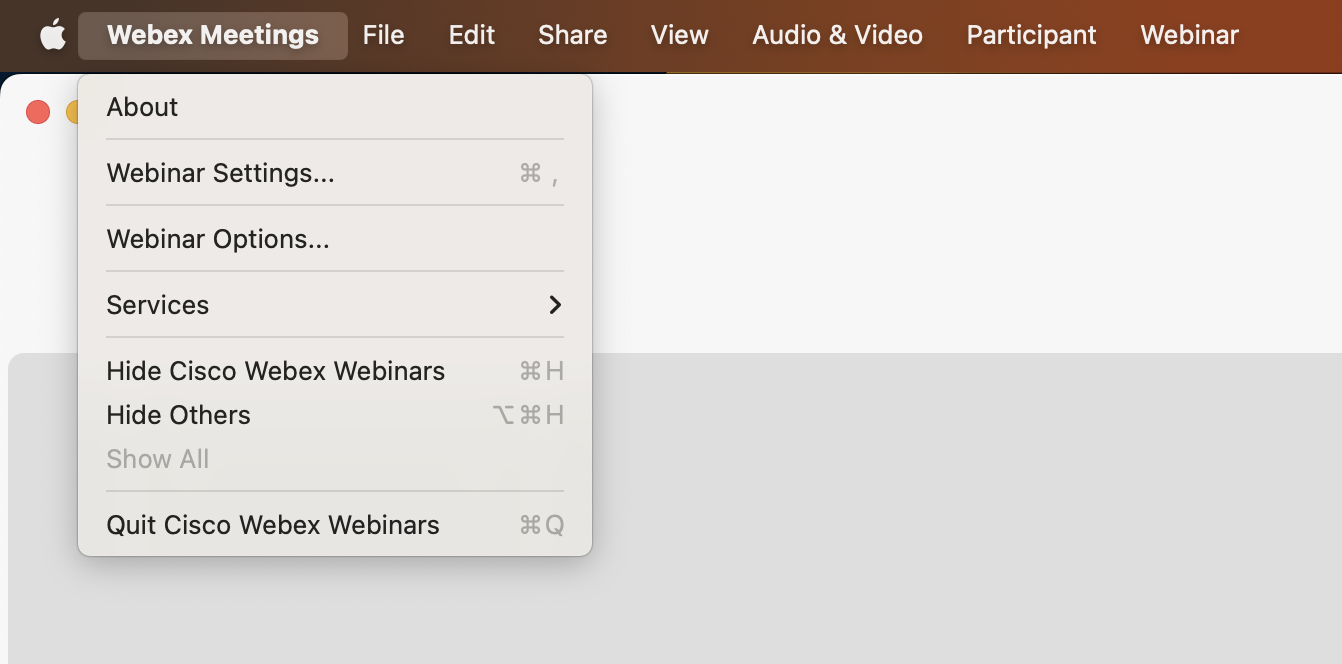
You can enable or disable some panels and features here. Be sure to hit Apply when finished.
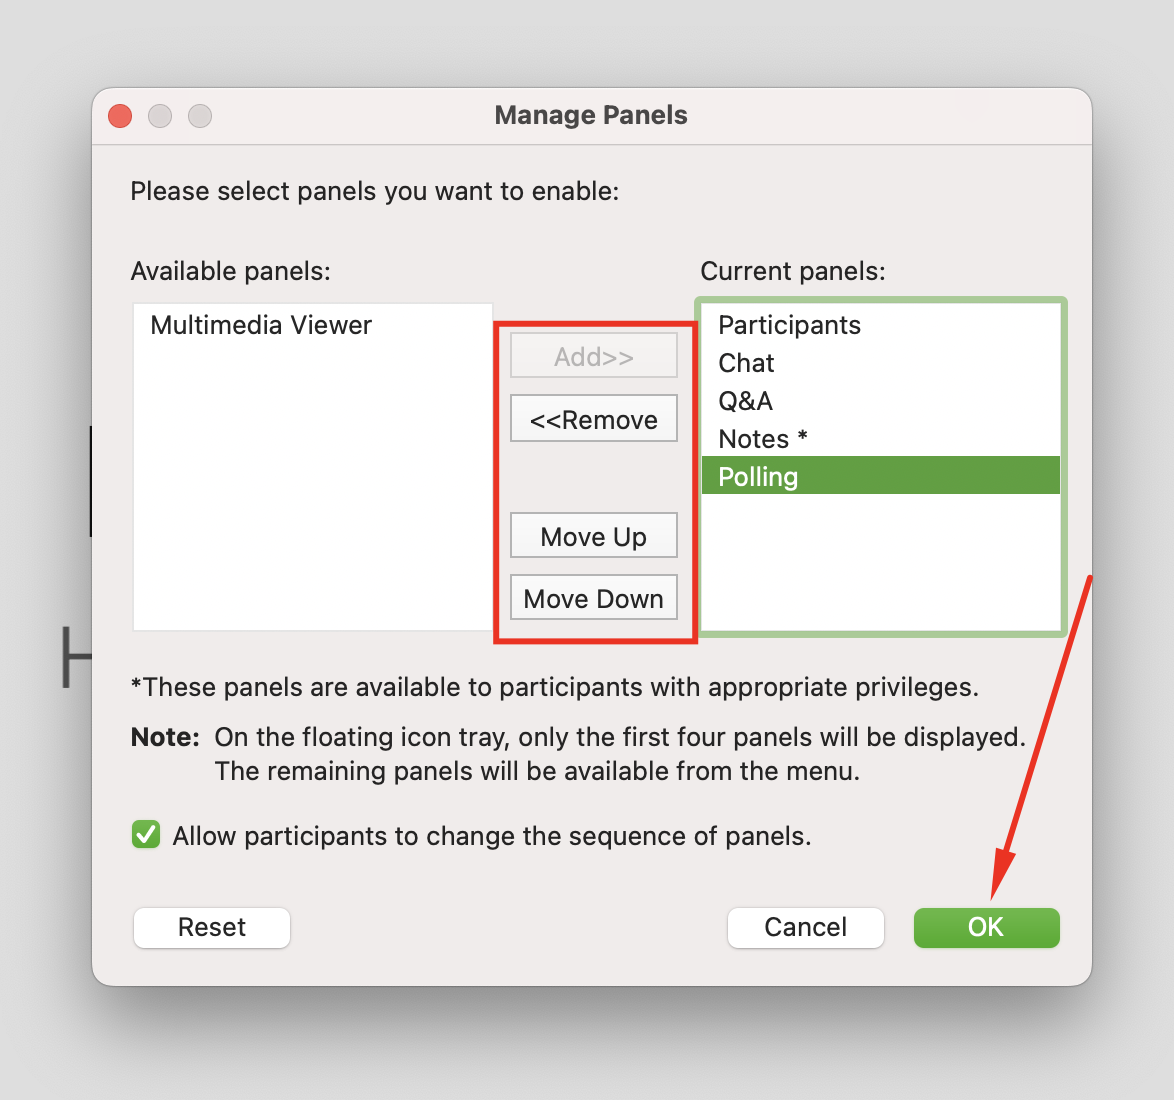
There are some additional panel settings in the View menu > Panels > Manage Panels.
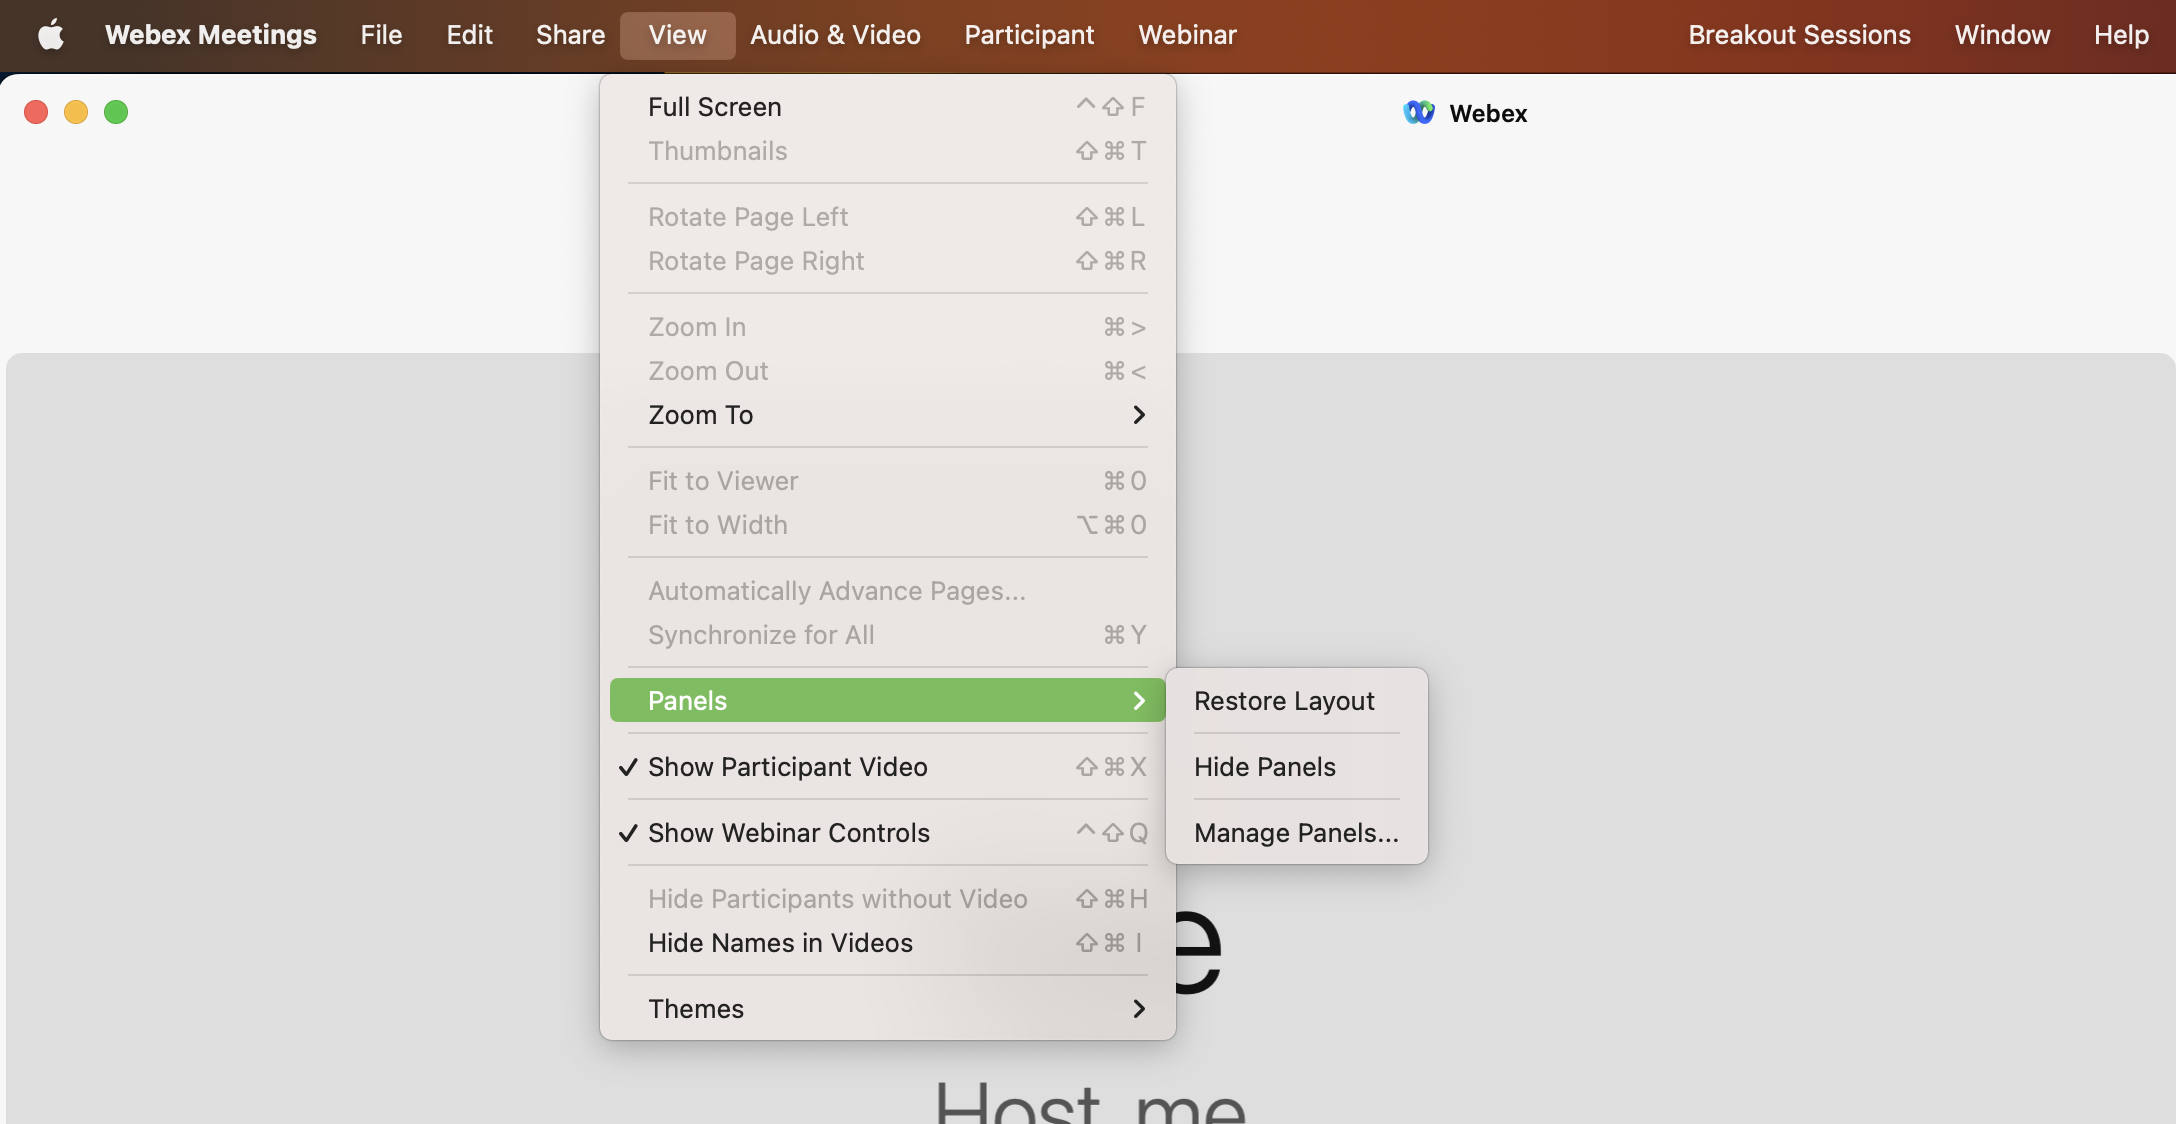
You can remove/add panels here; or move the positioning of the panels. Be sure to hit OK to save the changes.
Modifying communication privileges
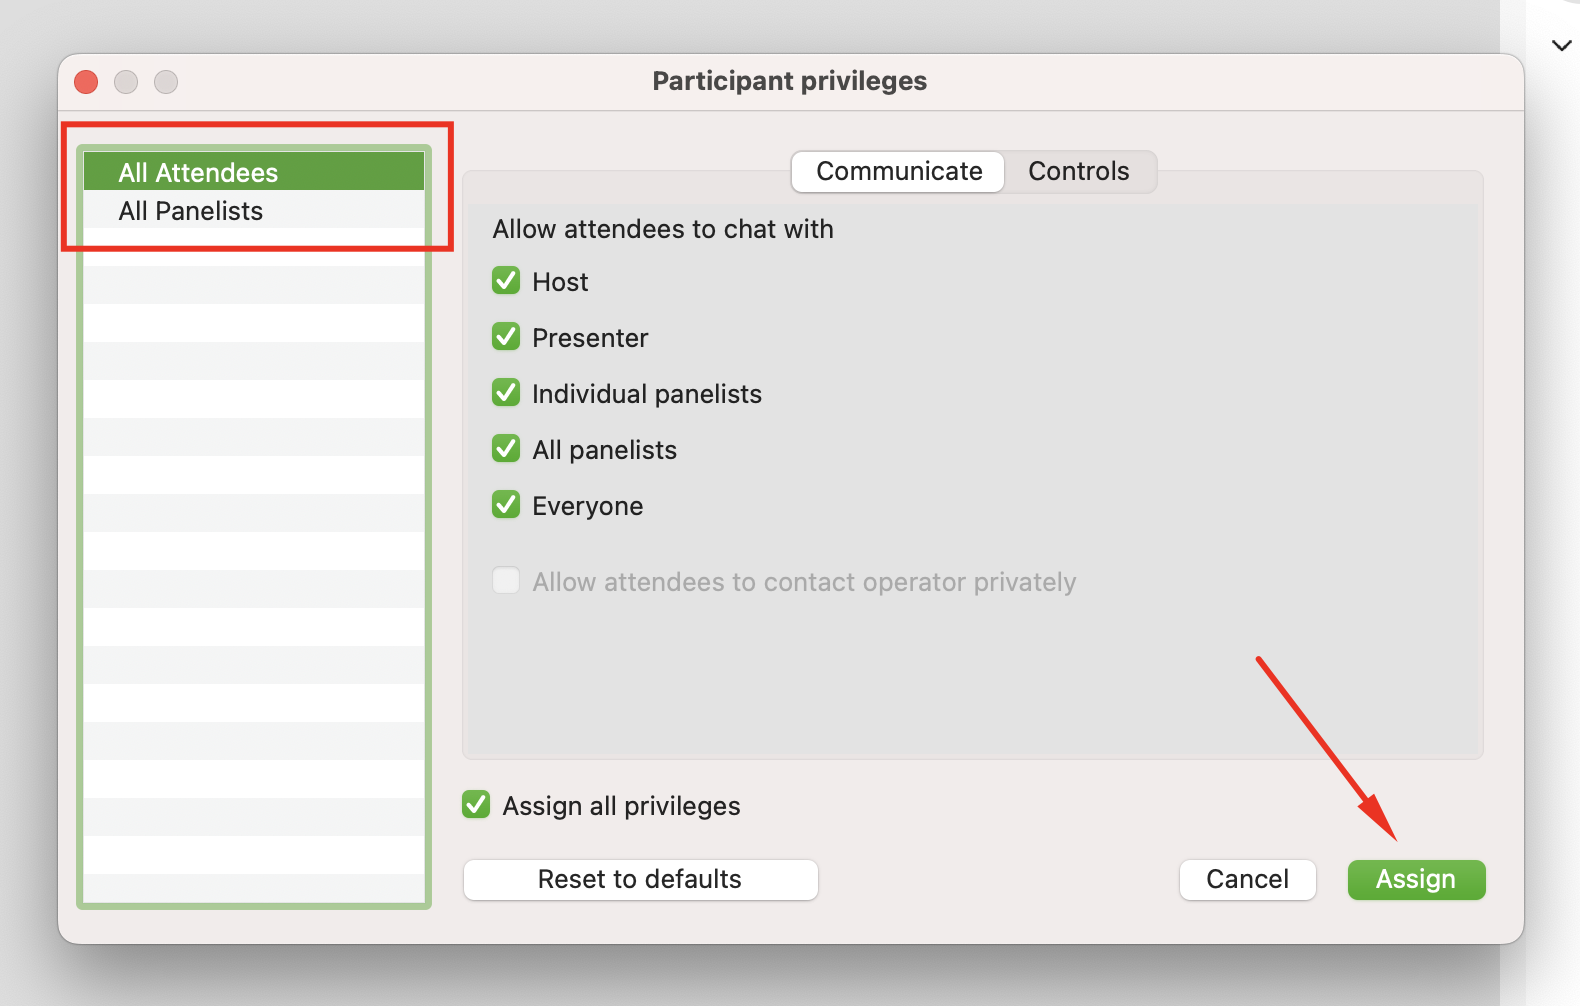
Communication privileges can be managed in the Participant menu > Assign Privileges.
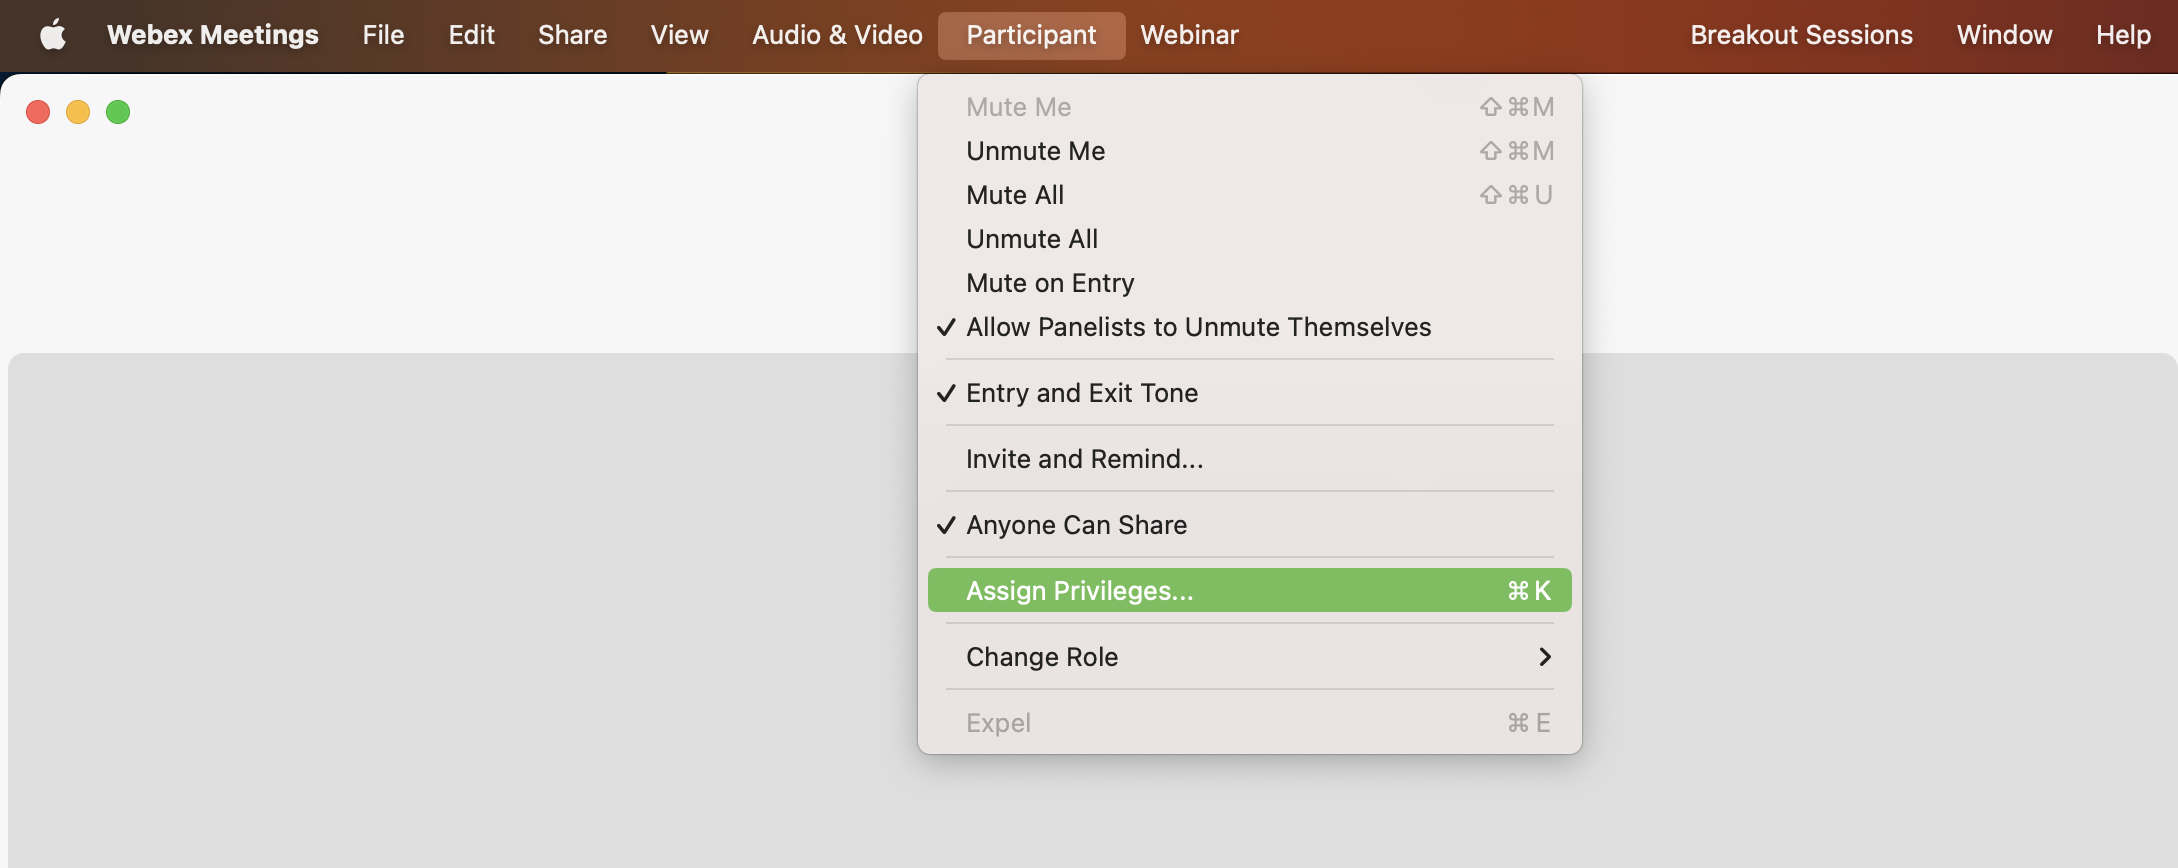
You can then modify who attendees and panelists can chat with. By default all attendees can chat with whomever they would like but this can be limited to only the host, for example. The conference organisers will let you know if you need to change these settings. Be sure to hit Assign when a change is made.
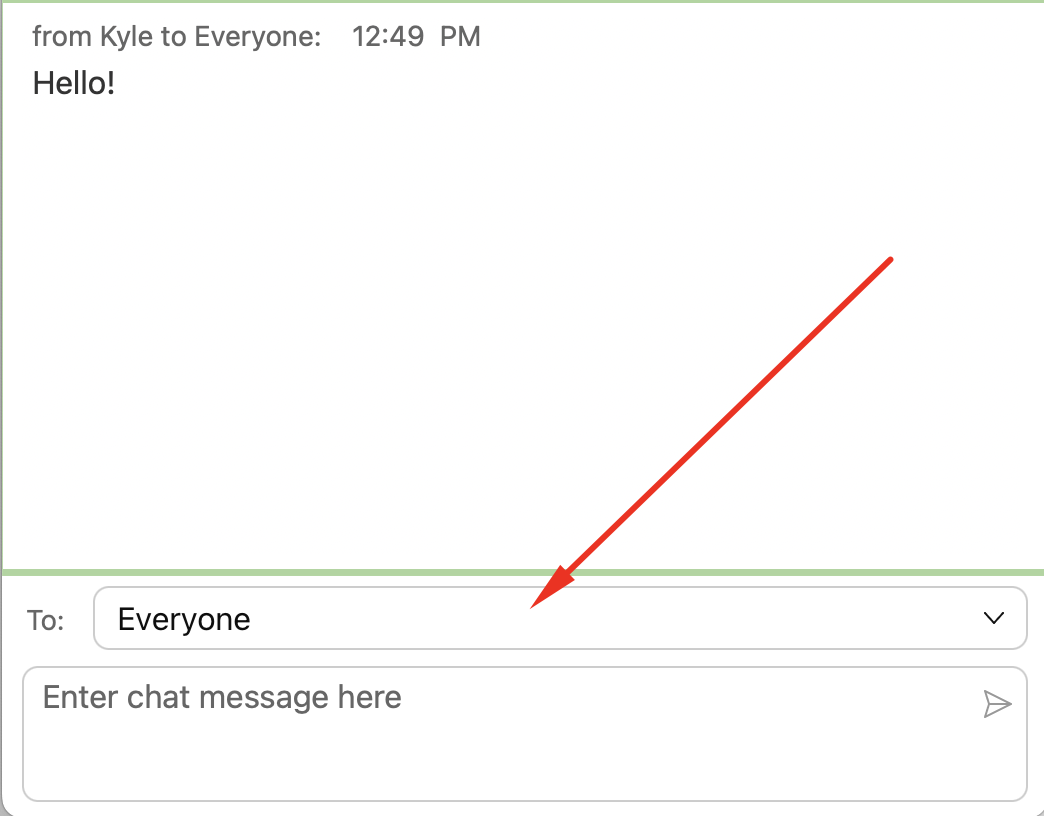
You can instruct participants to choose a specific group or person to chat with through the drop-down menu. The options they will have depend on the above settings.
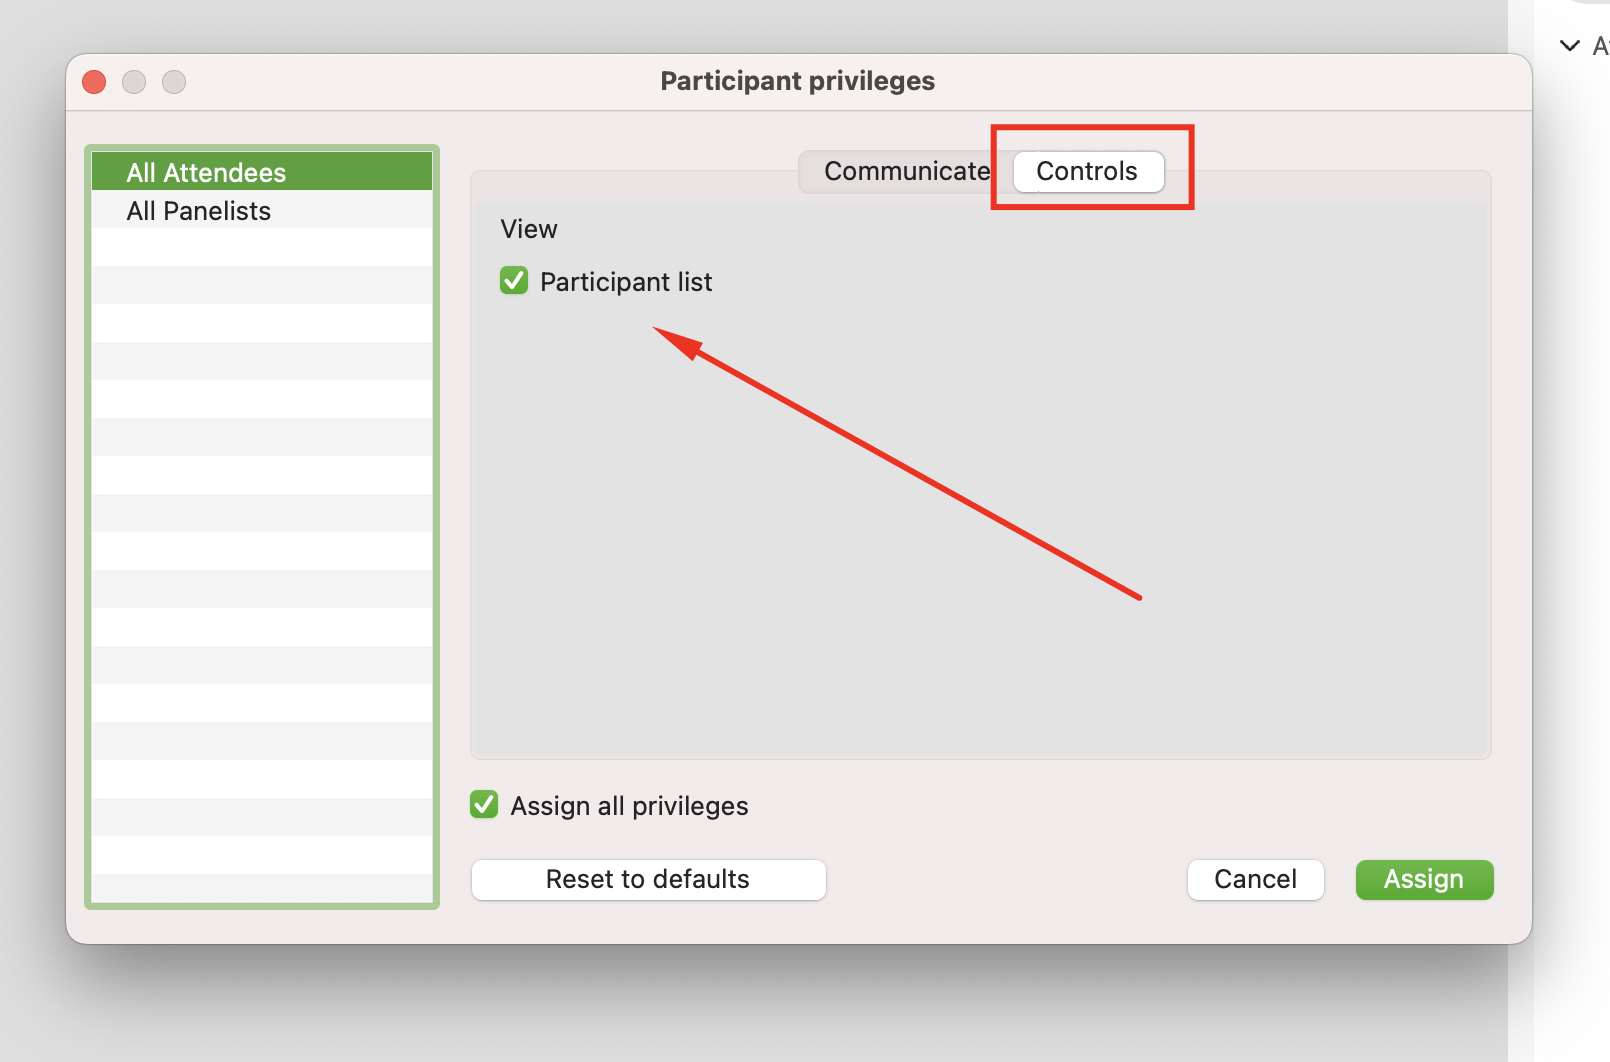
Disable Attendee View (if not wanted)
By default, all attendees can see the display names of everyone else in the meeting room. This can be limited in the Participant menu > Assign Privileges > Controls tab. Be sure to hit Assign to save the change.
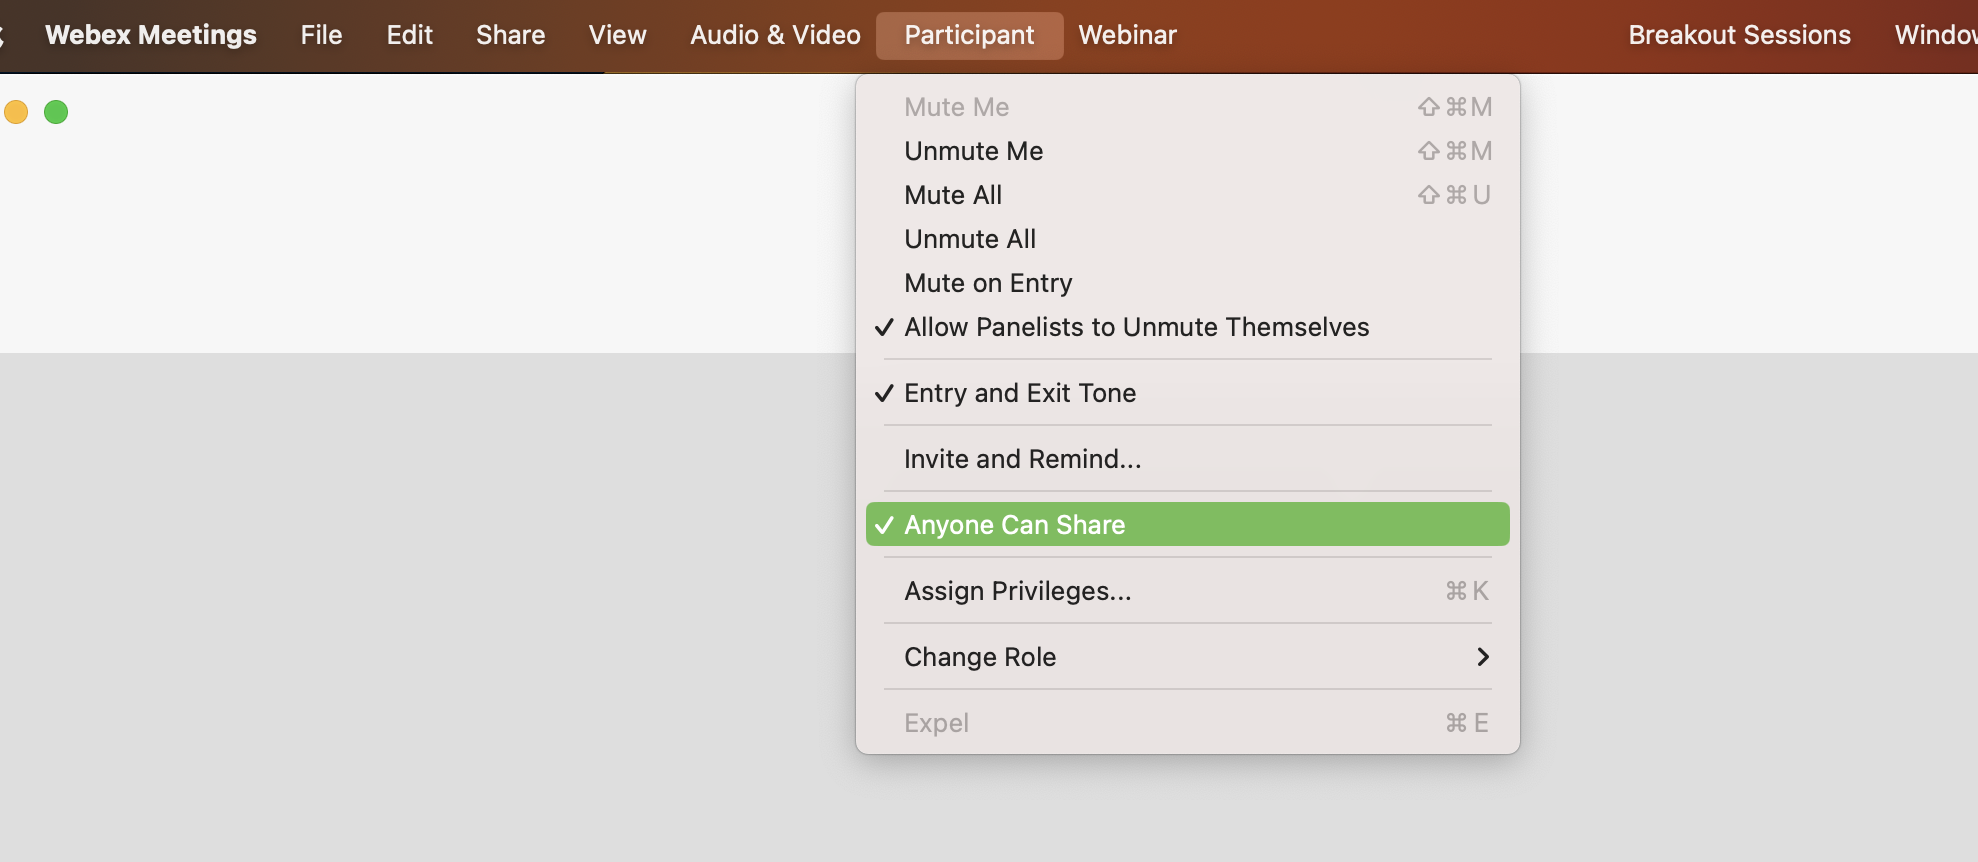
Limit screen sharing abilities
By default, any panelist can begin screen sharing at any time. This means that a panelist could accidentally 'steal' the screen sharing role from a presenter. We highly recommend unchecking the Anyone Can Share option in the Participant menu each time a meeting room is opened.
Step 4: Start a Practice Session (if using)
You can open your 'virtual green room' and promote speakers to panelist so they can test their equipment and chat privately away from other attendees. Check out this article for more details: Practice sessions: Your Virtual Green Room
During the Event
Now you’ve started hosting the event, your audience & presenters will be able to join as attendees as soon as the stage goes live in Ex Ordo. This will be the start time of the first scheduled session on the stage. Below is a list of things you may need to do throughout sessions.
Step 1: Promote attendees to be a panelist and co-host
As folks are joining the webinar, you can monitor the Attendee list for those who are taking part in the session. All speakers and session chairs will access the event as Attendees. It’s your responsibility to promote them to Panelists at the appropriate time, so that they can use their camera and microphone to talk about their work and answer questions.
Check out this article for details on how to promote attendees: Promoting Attendees on your Live Stage (Webex Webinars)
Step 2: End the practice session to begin the session (if using)
Check out this article for more details: Practice sessions: Your Virtual Green Room
Step 3: Share helpful information with the participants
Take a moment to show Attendees how to access and turn on the different features you’re using, e.g. chat, Q&A. Examples include:
- How to access and use the chat feature (if using)
- How to access and use Q&A (if using)
- What the upcoming schedule looks like for the day
- Anything else that is important for attendees to know about your event
You can also inform the audience how they can change the video camera layouts of those presenting in the session using the controls in the top right hand corner. Changing this view may be a more enjoyable experience for them.
- Grid View: This will show all speakers onscreen at the same time.
- Active Speaker View: This will show one speaker at a time.
- Floating Panel: This will allow you to go full screen with the video.
If there are any further housekeeping items you want to address with your Attendees, do so now.
We highly recommend reminding panelist that they can mute/unmute themselves at anytime. It is important they are aware of this so they do not accidentally interrupt a presentation.
Step 4: Record the Session
The conference organisers will let you know if you should record sessions or not. They may ask you to check with presenters before they begin their presentation. If you are unsure, please reach out to the conference organisers directly. They will tell you exactly when to start and stop recordings, or not to record at all.
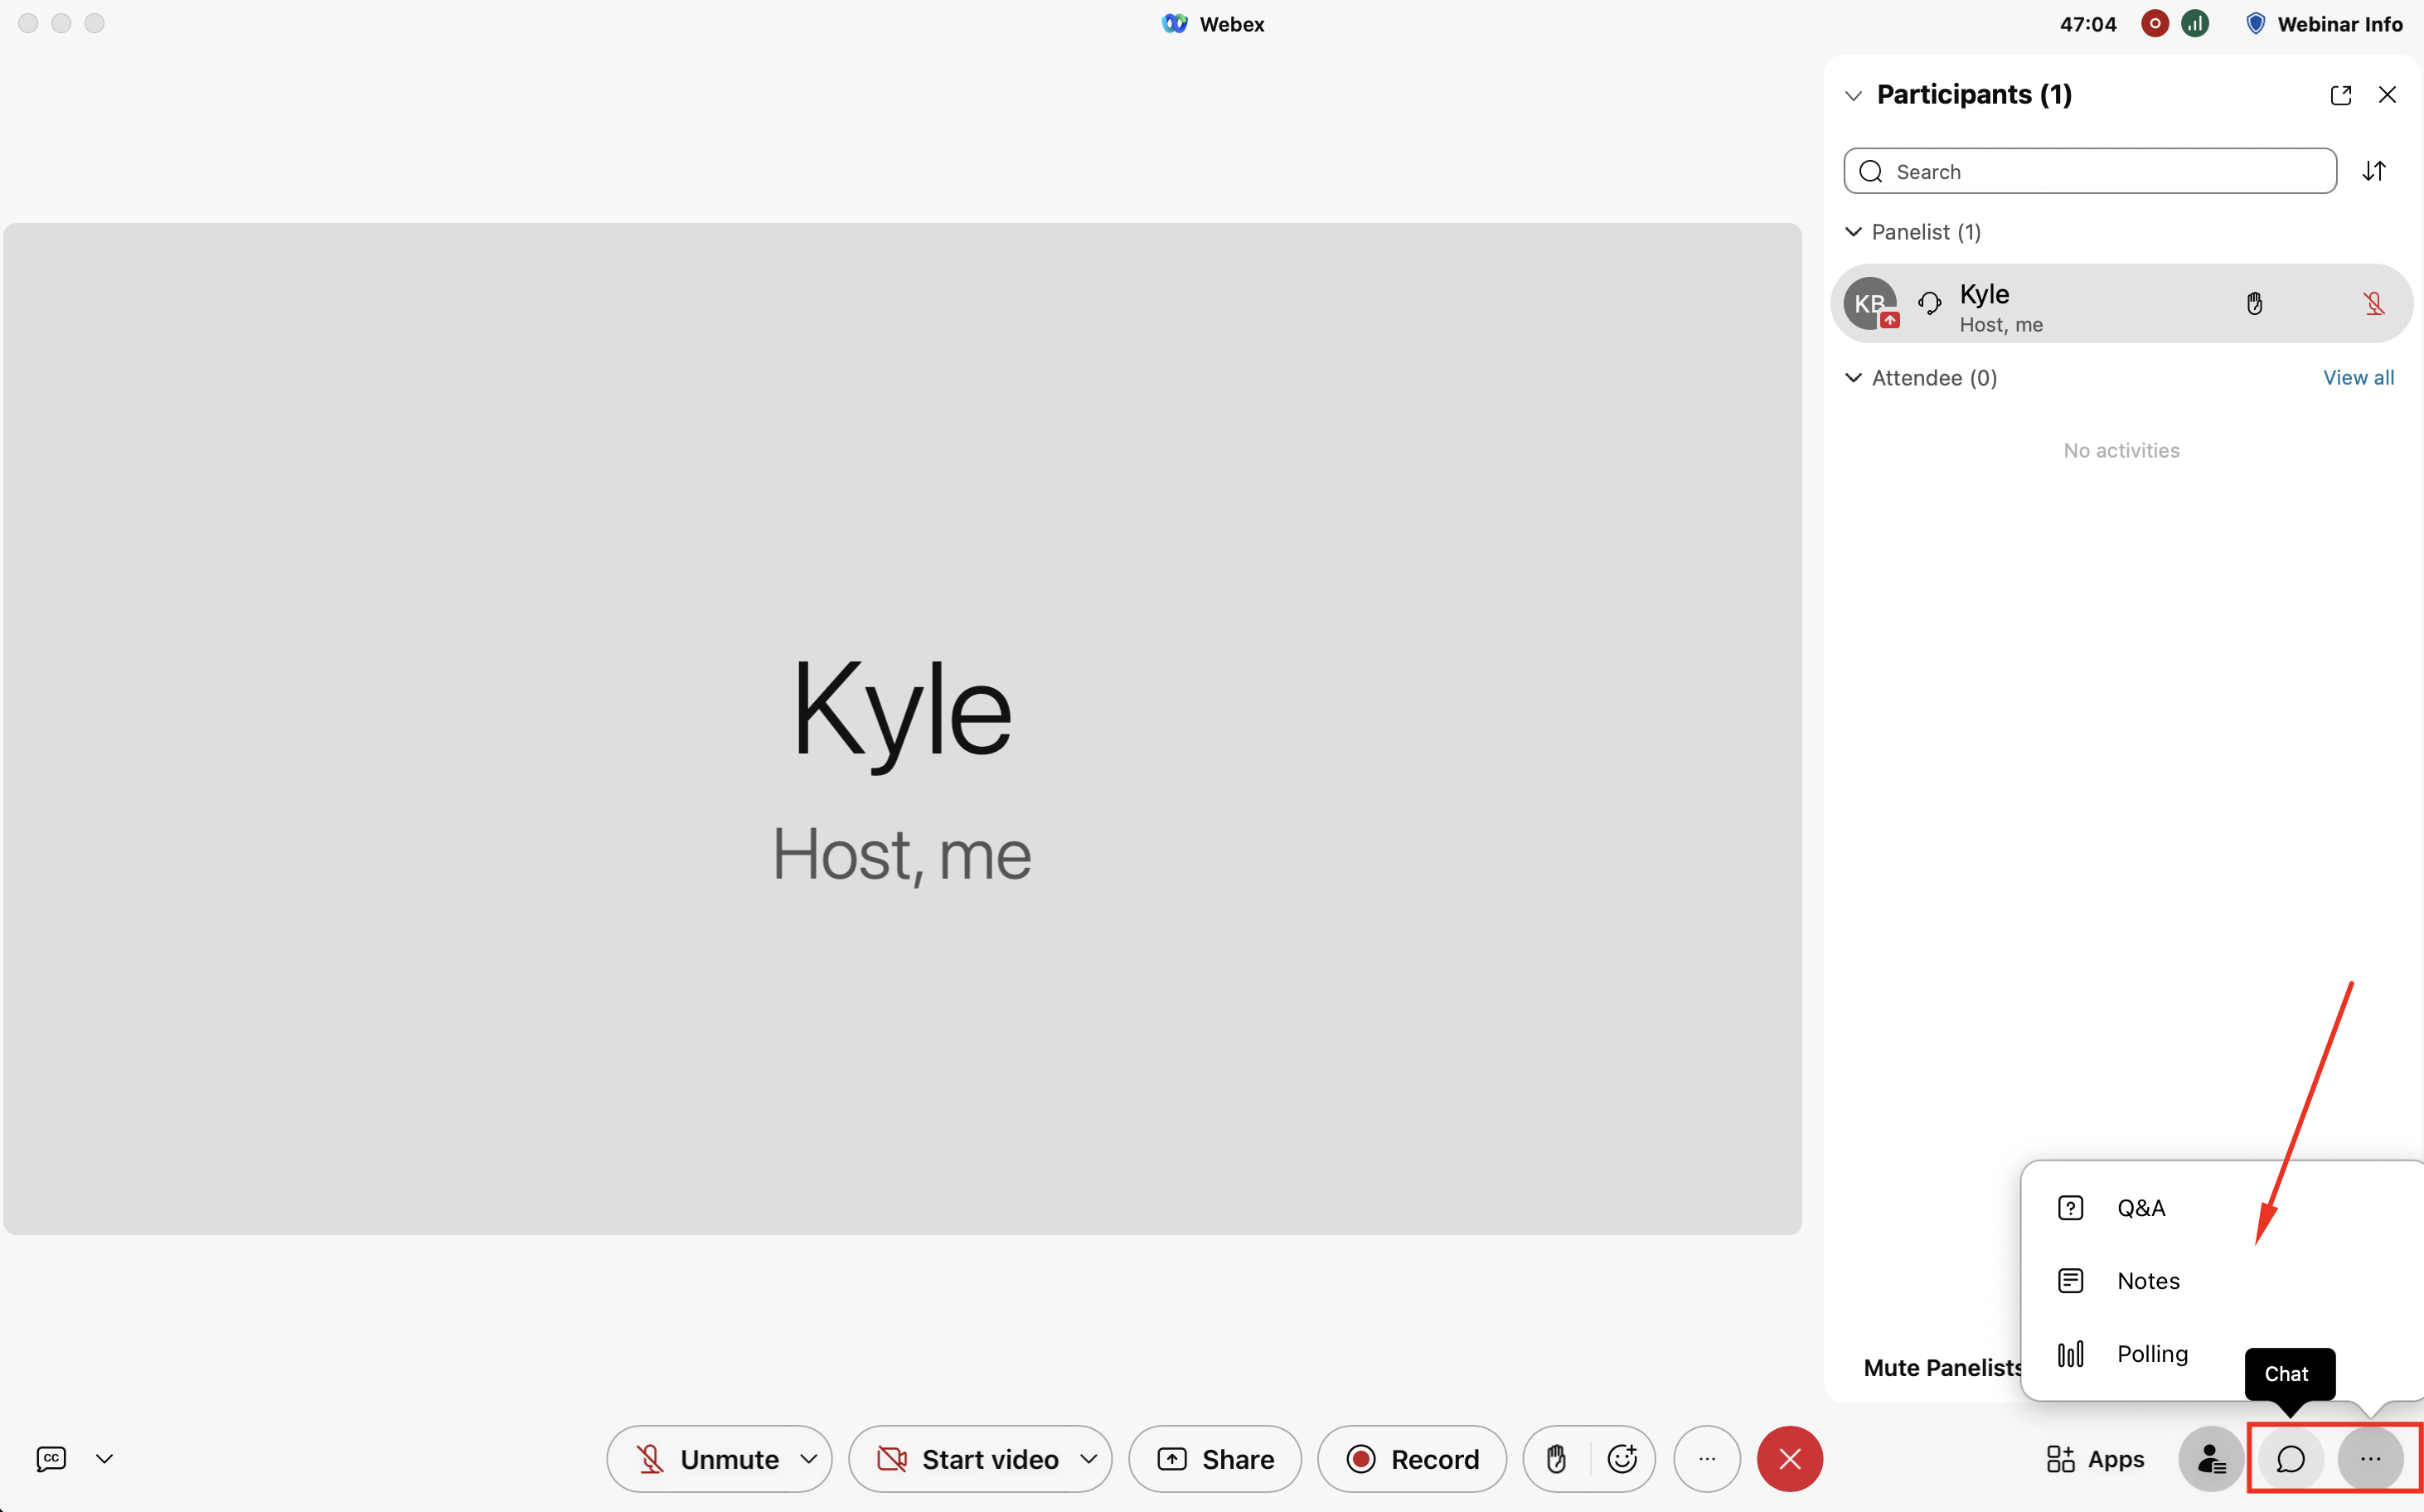
You can begin recording by selecting the three dots at the very bottom of the Webex app and clicking Record. By default, all recordings save to the cloud. Please do not change this setting.
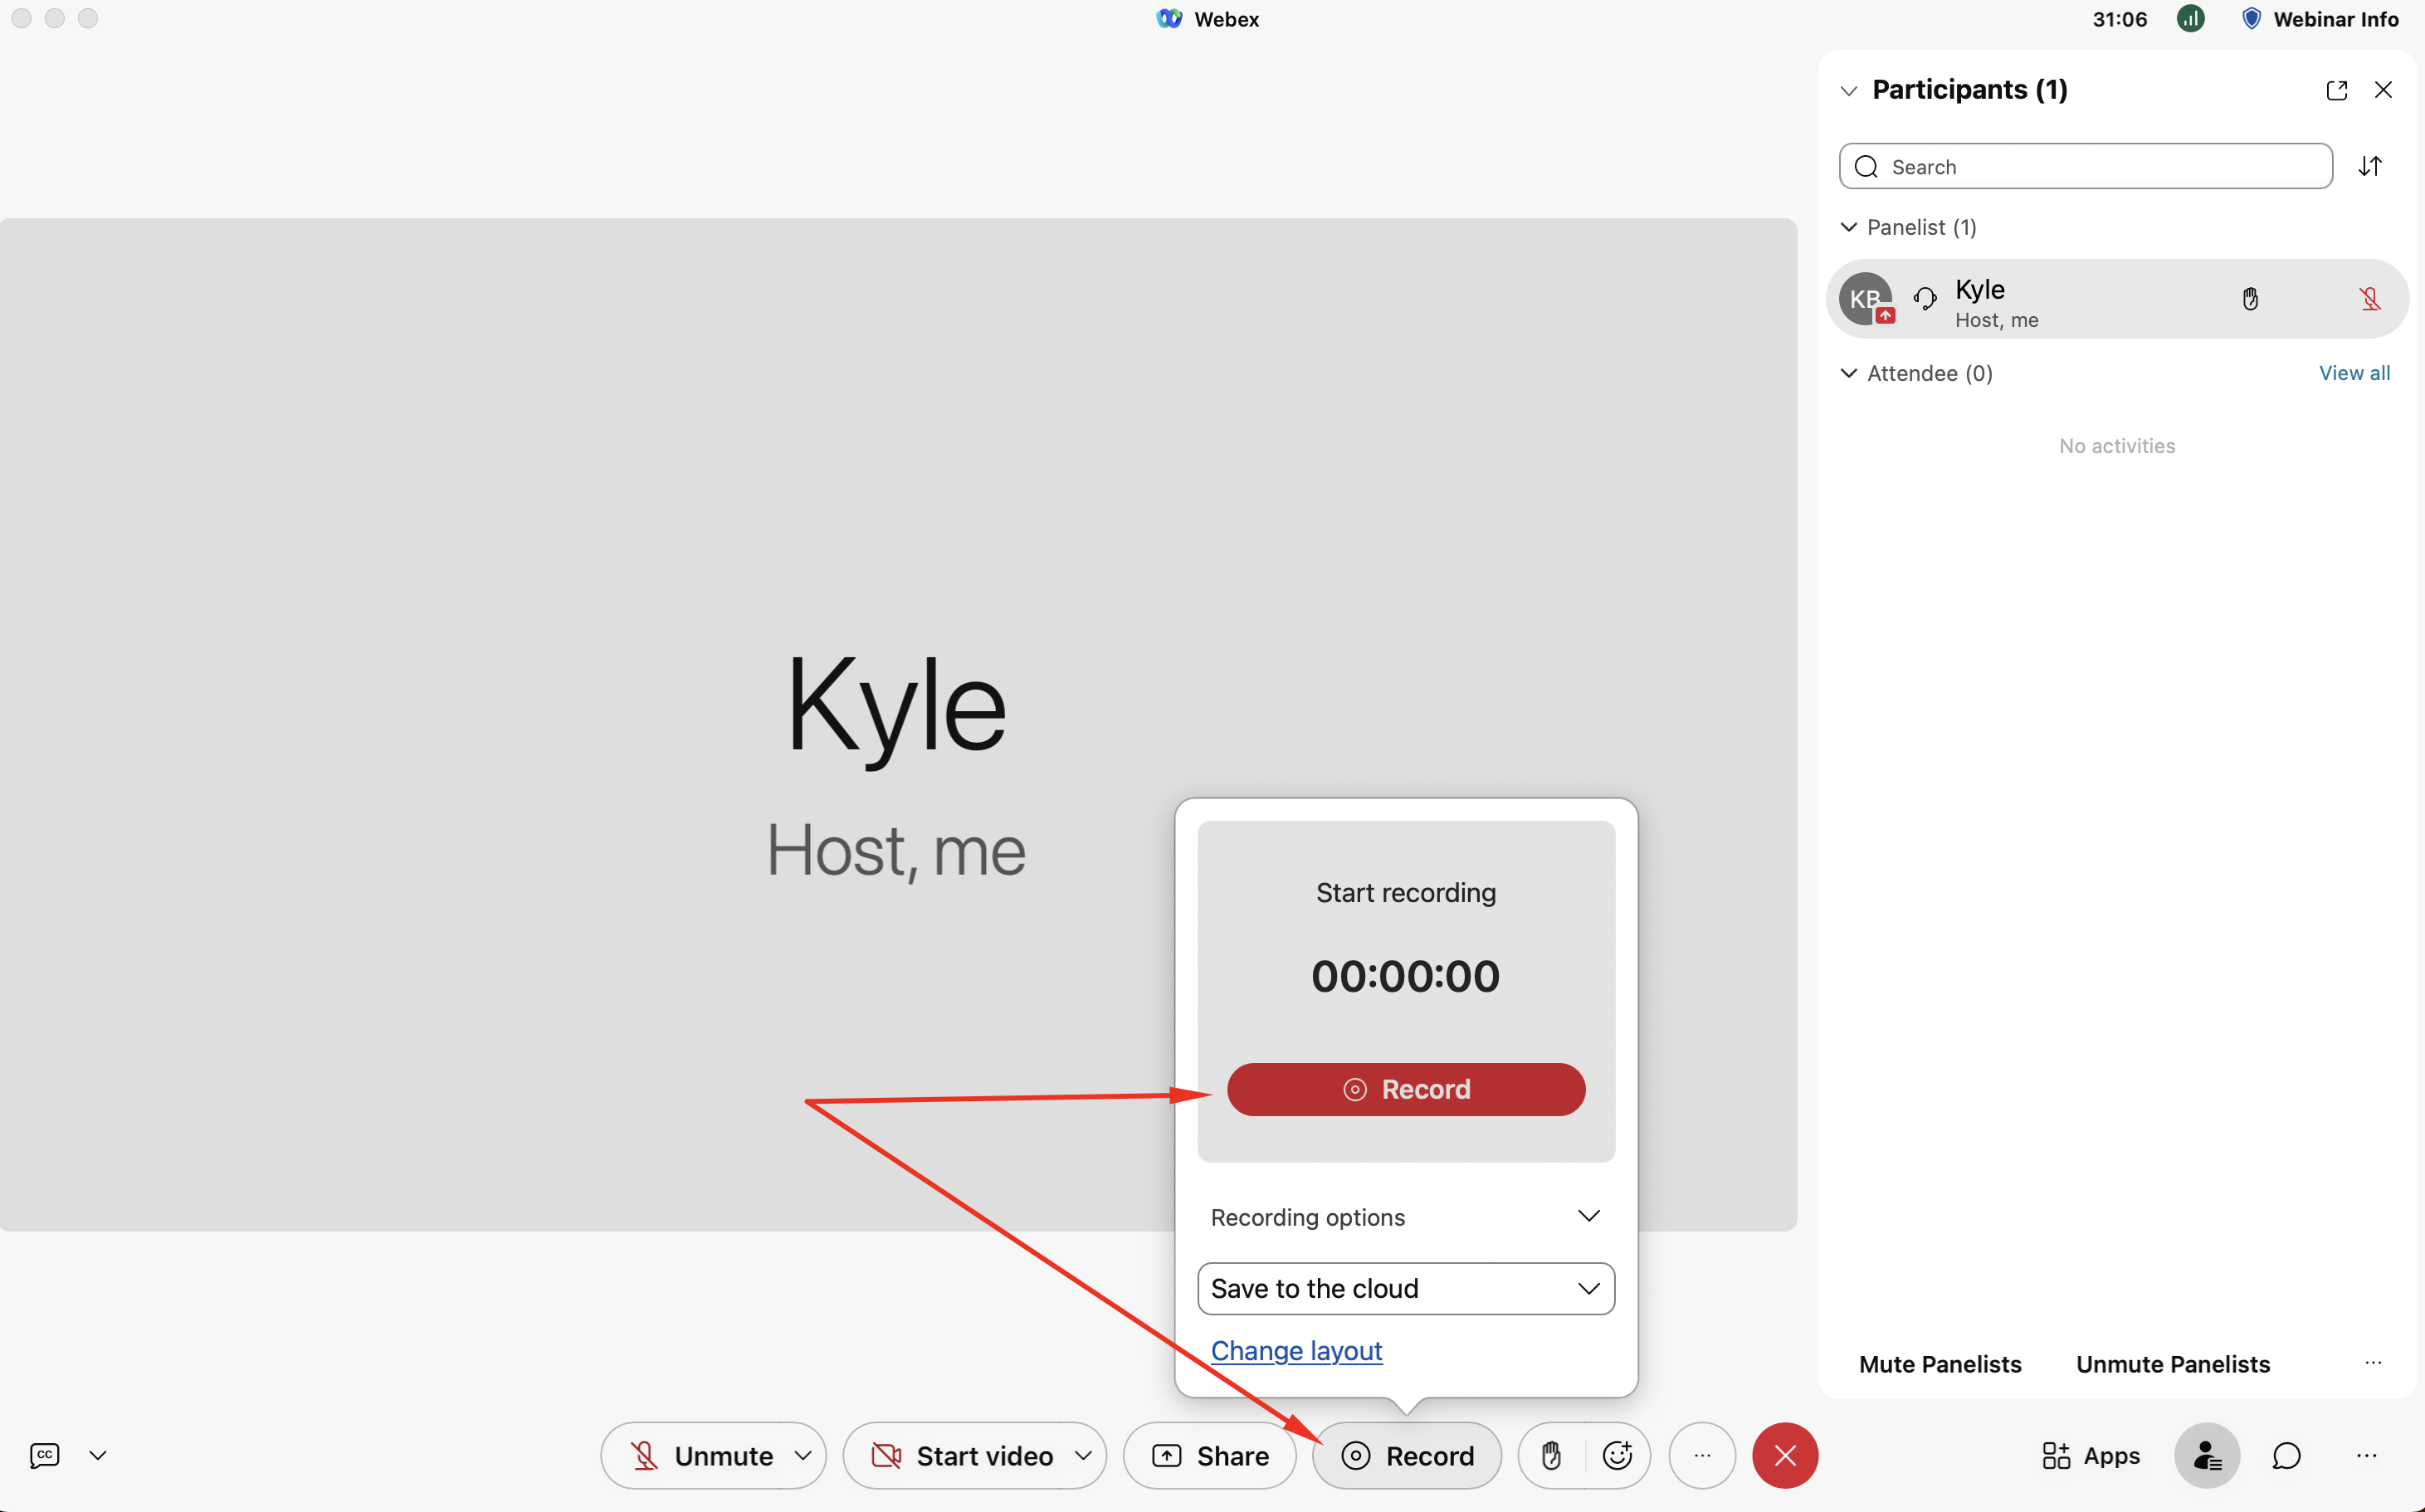
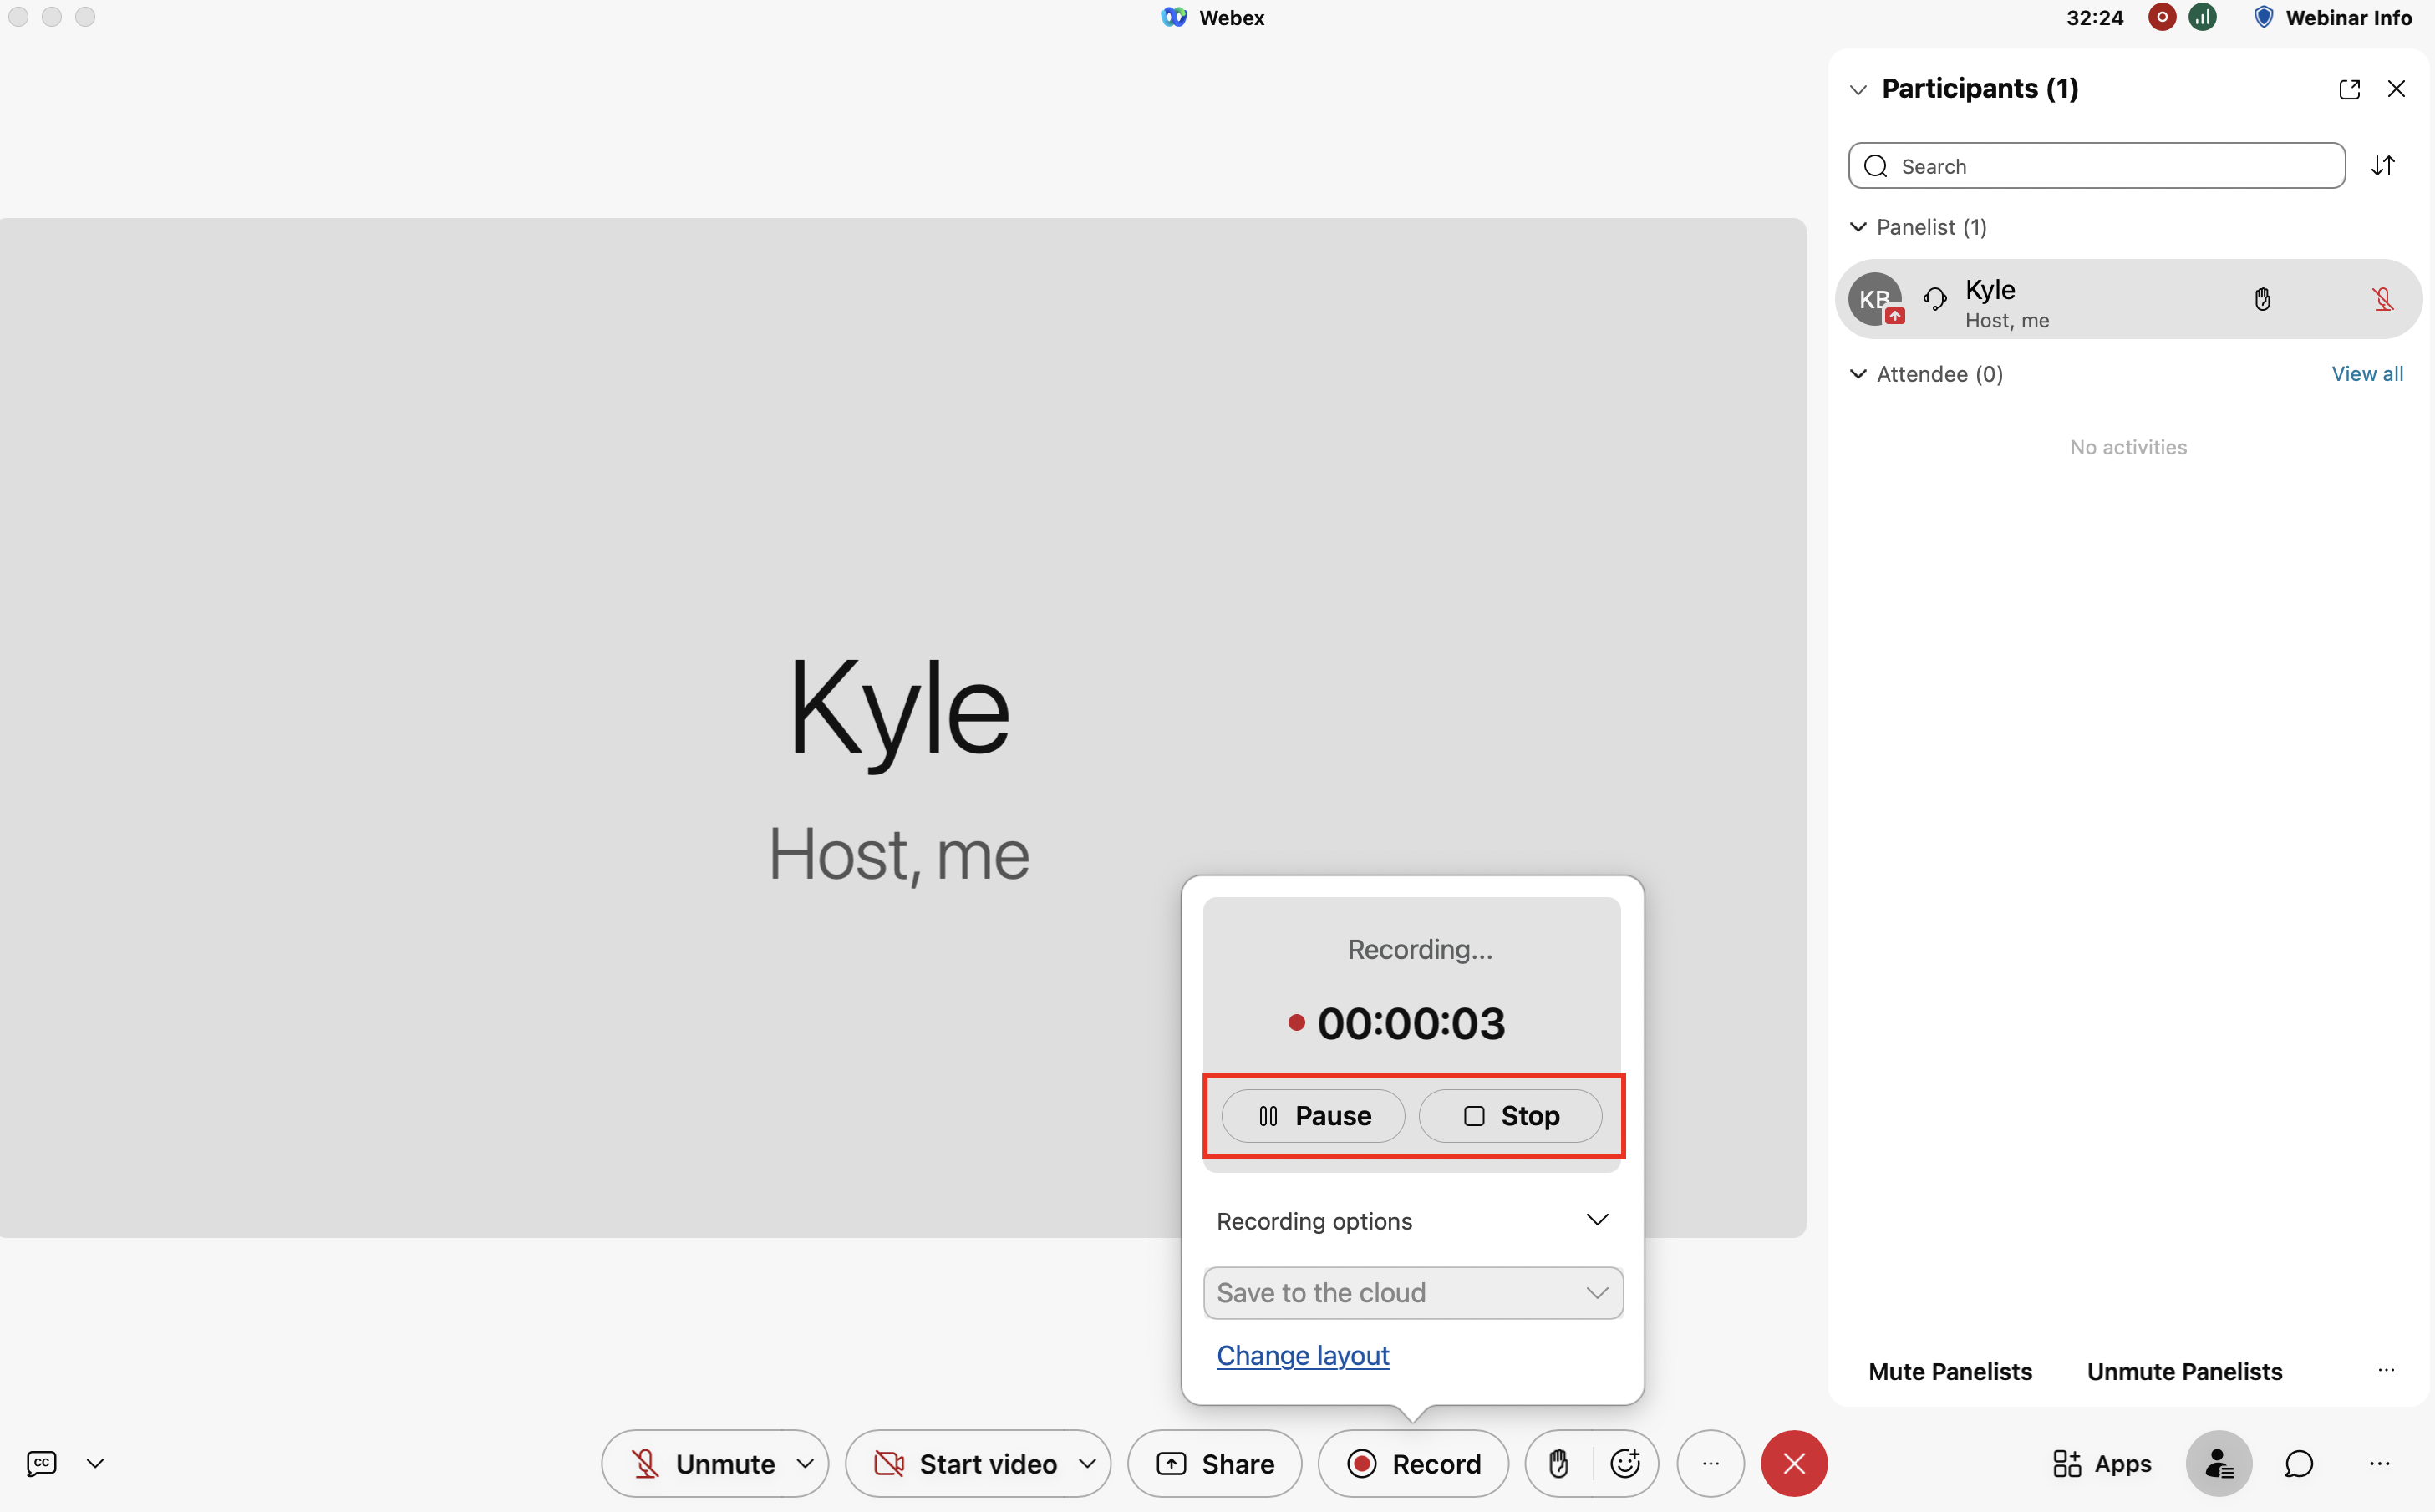
Recordings can be paused or stopped at any point. One recording will be created if a recording is paused and later resumed. If you stop recording and later hit start, two separate recordings will be created. The conference organisers will let you know what they would like you to do. You can reach out to them directly if you are unsure!
Note: If you are sharing your screen the option to record will appear in the toolbar at the top of your screen.
Step 5: Begin screen sharing
You as the stage manager may share attendee slides while they speak, or you may need to make attendees presenters so they can share their own screens.
For more info on screen sharing and how to do so in Webex, see this article: Sharing Content on a Live Stage
Friendly Warning!
Please be careful about what is open on your screen when you share to avoid sharing personal information. We advise everyone to mute notifications on your computer so the audience do not see personal messages.
Note: When sharing your screen, your Webex view will change and your toolbar will be along the top.
Passing the Presenter Role
If the speakers have something to share as part of their presentation (e.g. PowerPoint slides, Keynote, PDF), you will need to pass the Presenter role to them if you have prevented anyone from sharing at any time. They can then share their screen to present the content.
The stage manager or current presenter can pass screen sharing permissions to the next person by following the steps below.
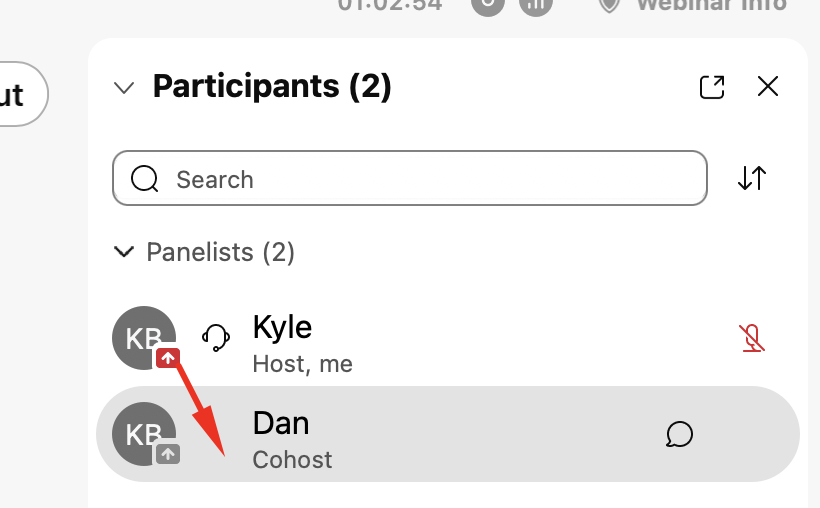
In the Participants panel, right click on the name of the panelist whom you want to designate as the presenter. Hover over Change Role and select Make Presenter.
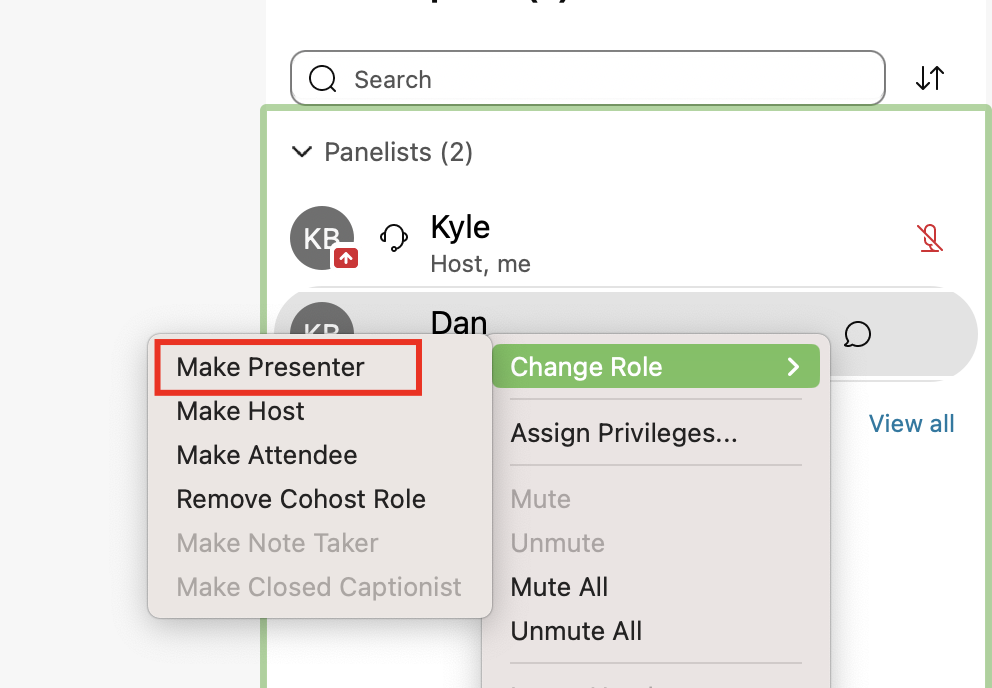
You can also 'pick up' the red presenter icon, move it to the next presenter's name and drop it.
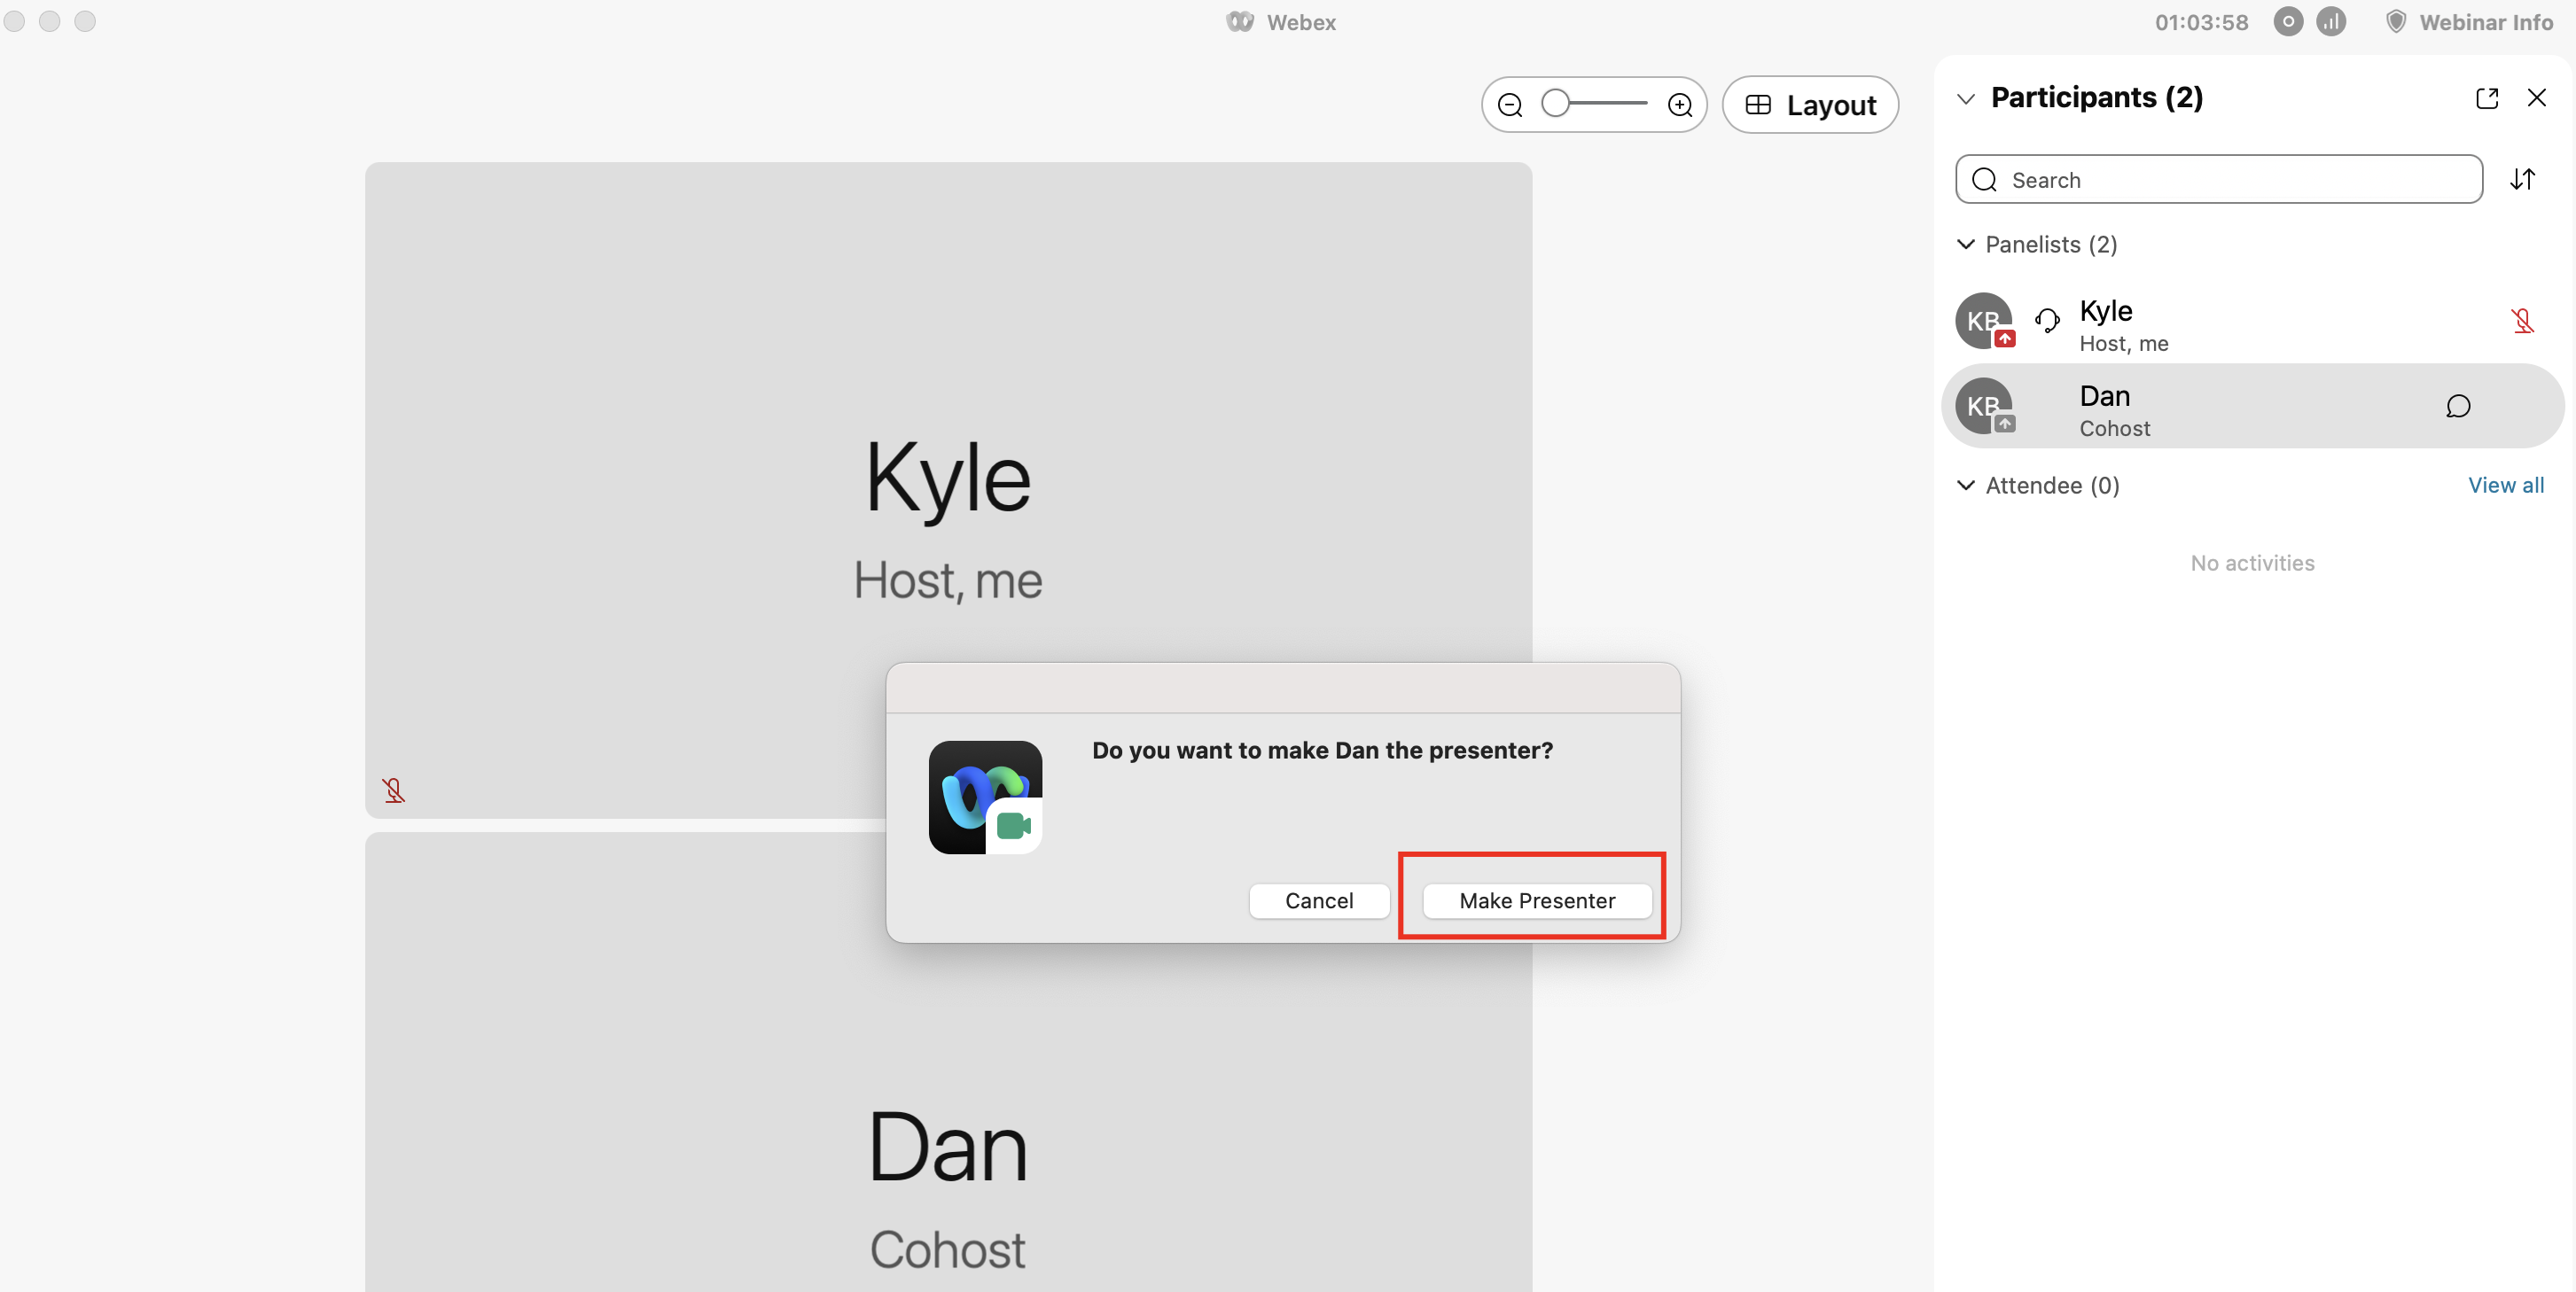
Confirm your choice.
That's it! The host can take back or change the presenter role at anytime by following the steps above.
Step 6: Unmute Attendees (if needed)
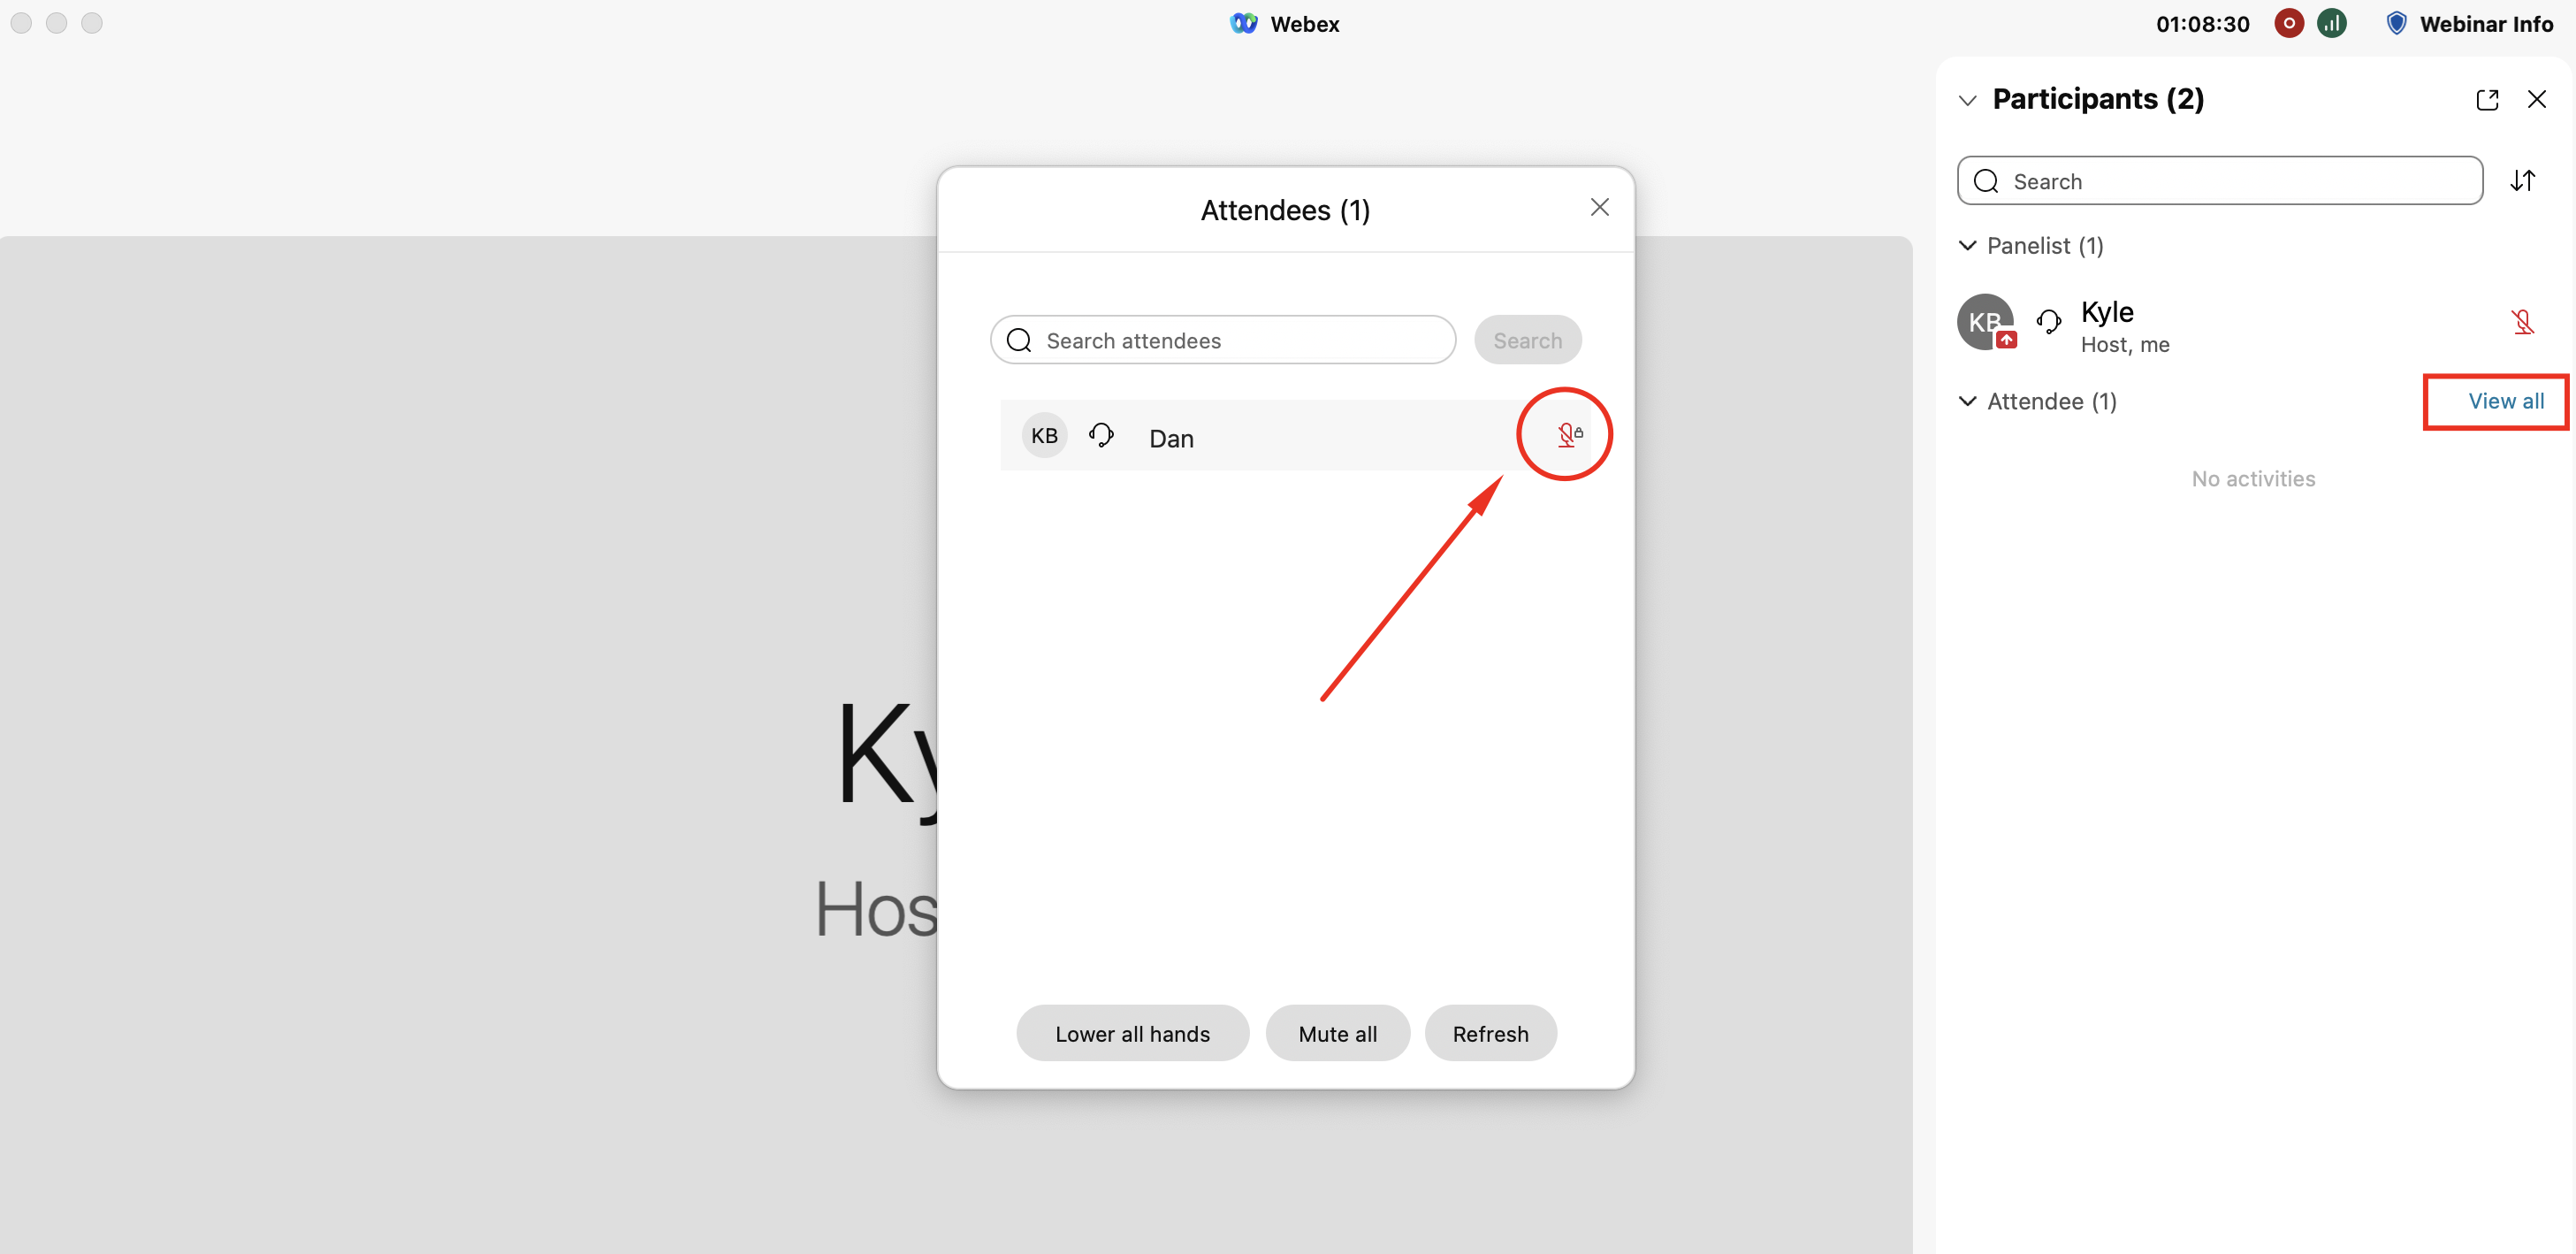
At some point you may want to allow an attendee to speak without turning on their camera. For example, you may let attendees ask their questions verbally during a Q&A. To do this, simply unmute attendees from ‘View All Attendees’ in the Participants Panel and click on the microphone next to their names.
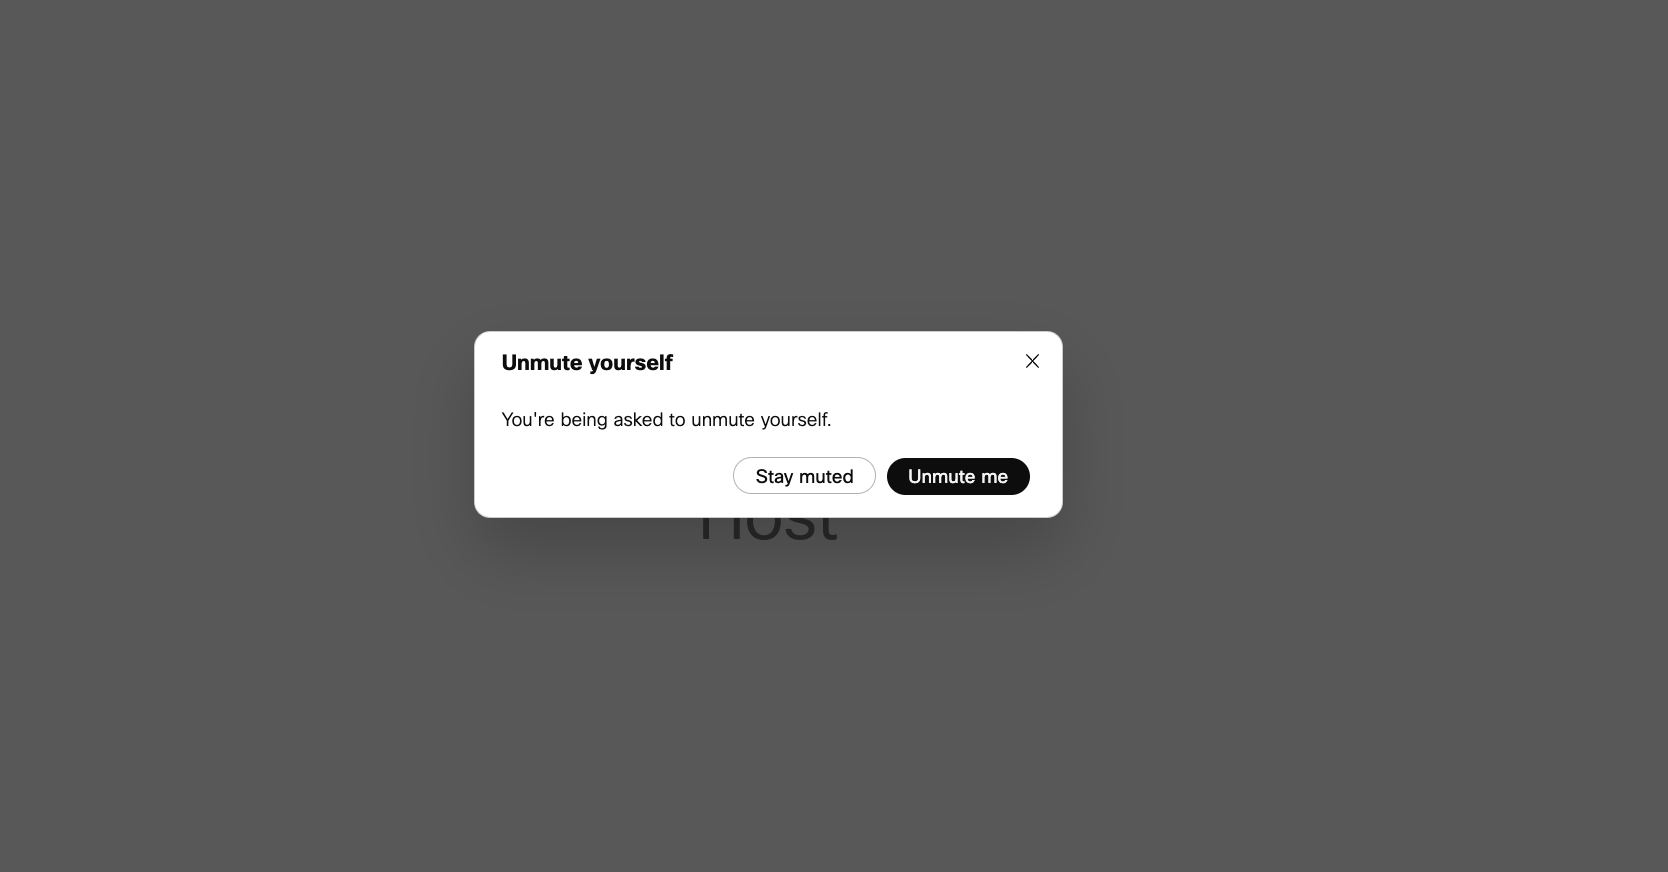
Attendees will be asked to unmute themselves, but they can stay muted. There is no risk of unmuting a person when they are not expecting it because they must accept the invitation.
Step 7: Manage/Run the Session
At this point, the session should be underway and your speakers will be doing their thing. You’ll need to be there throughout the session hosting the Webex meeting, promoting folks to Panelists when needed, passing the presenter role to active speakers, and generally ensuring the smooth running of the session.
You may also be managing the different panels being used, e.g. Chat and Q&A. For more details on managing those, check out this article: Managing Chat and Q&A during the Event (Webex Webinars)
